How to Resole Hiking Boots: Quick Guide
If your hiking boots are losing tread but still feel solid, don’t toss them—resole hiking boots instead. A professional resole can restore grip, extend life by years, and save you hundreds compared to buying new. High-quality hiking boots often wear out at the sole long before the upper fails. When done right, resoling preserves the broken-in fit you’ve earned mile after mile, avoids blisters from stiff new boots, and reduces environmental waste.
Resoling isn’t just for vintage leather boots. Brands like SCARPA, Kenetrek, Meindl, Asolo, and Lowa offer official repair programs using original-spec materials. Whether you’re a weekend hiker or log 1,500 miles a year, knowing when and how to resole your boots protects your investment and keeps you trail-ready. This guide covers everything: cost, construction types, top repair services, DIY risks, and how to choose boots built to last.
Identify Resoleable Boot Construction
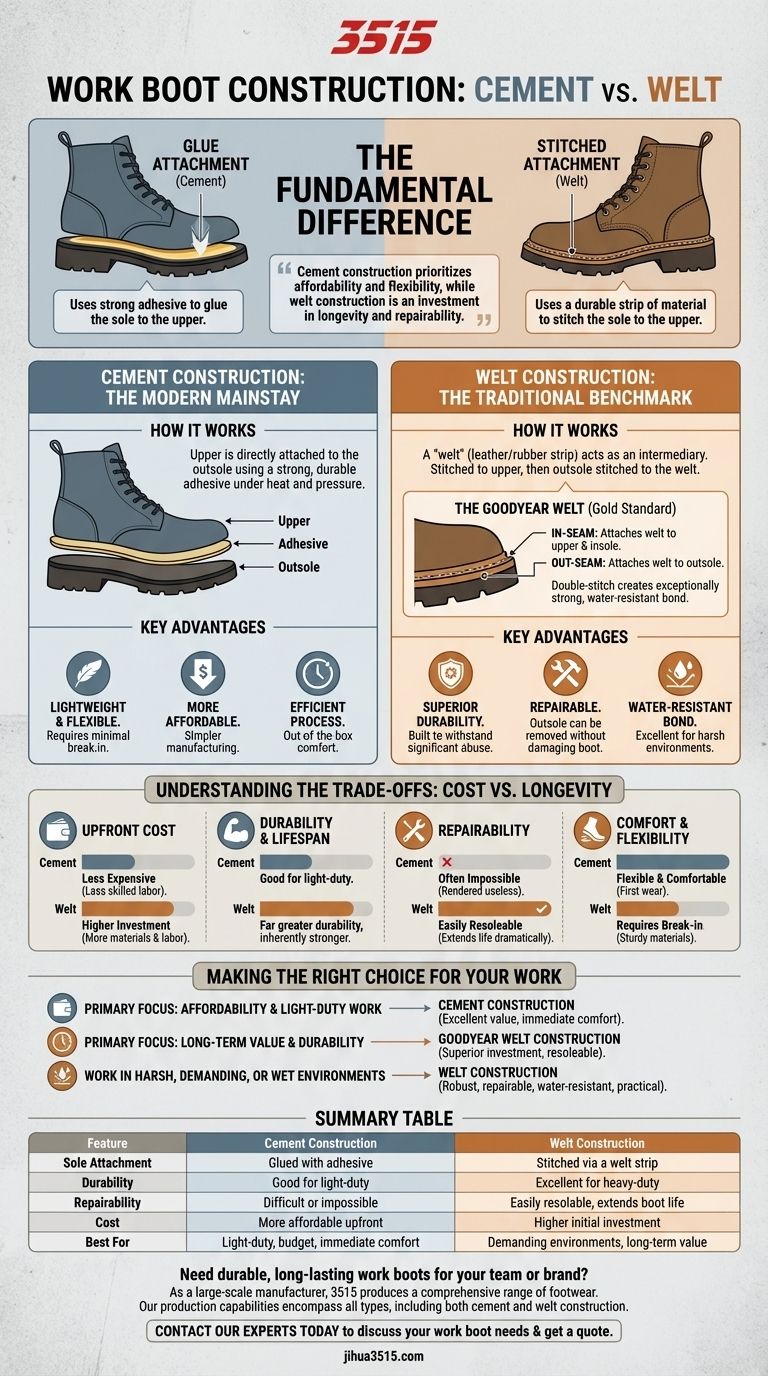
Not all hiking boots can be resoled. The key is construction type.
Double-Stitched Welt = Resoleable
Boots with double-stitched welts (like Goodyear or Norwegian welts) are designed for multiple resoles. The sole is stitched and glued, allowing cobbler access for replacement. These models often use full-grain leather and Vibram-compatible outsoles, making them ideal for long-term rebuildability.
SCARPA, Meindl, and Zamberlan use this method in many alpine and backpacking models. The stitching creates a mechanical bond that holds even under extreme conditions, and professionals can cut the old sole away and reattach a fresh one without compromising integrity.
Cemented Soles = Limited Resoleability
Most modern hiking boots use cemented construction, where soles are glued directly to the upper. While some resoling is possible, repeated repairs weaken adhesion. Over time, delamination becomes harder to fix. Lightweight trail runners and budget models often fall into this category.
These boots may only survive one professional resole. After that, the glue interface degrades, and the upper material begins to break down, making future repairs unreliable.
Randed vs. Bonded Toe Caps
Avoid wax treatments (like Sno-Seal) on boots with bonded toe caps, where the outsole wraps up and adheres to the upper. Wax migrates into leather and prevents proper adhesion during resoling. Boots with a rubber rand (a separate protective strip) are safer to treat and remain resoleable.
A rubber rand acts as a sacrificial bumper and creates a clean edge for resole work. It also protects the upper from rocks and scuffs—making it both functional and repair-friendly.
Signs It’s Time to Resole
Catch wear early to prevent irreversible damage.
Tread Wear Below 50%
When lugs are worn flat or uneven, traction drops significantly—especially on wet rock or loose terrain. If the tread is gone but the midsole isn’t exposed, resole now. Waiting too long increases the risk of water intrusion and structural failure.
Outsole Delamination
Peeling at the heel or toe means moisture can enter, leading to mold, odor, and upper degradation. Small separations can be field-repaired temporarily, but full resoling stops further damage.
Inspect your boots after every long hike. Run your fingers along the sole edge. If you feel a gap or see daylight between the sole and upper, it’s time for action.
Midsole Exposure
If you see the midsole foam or EVA layer, water intrusion is likely. This compromises cushioning and can warp the boot’s structure. Resole immediately or risk total failure.
EVA foam breaks down quickly when wet, losing rebound and support. Once saturated, it cannot be restored.
Cracked or Split Rubber
Brittle, cracked soles lose flexibility and increase injury risk. Cold climates accelerate rubber breakdown. Replace before cracks spread underfoot.
Even small fissures can propagate under load. On rocky descents, a cracked sole may snap, leaving you stranded.
Compare Resole Costs vs. New Boots

Resoling typically saves 70% or more versus replacement.
Resole Pricing by Brand
| Service | Cost | Includes |
|---|---|---|
| Kenetrek Mountain Boot Resole | $175 | New outsoles, insoles, laces, minor repairs |
| Kenetrek Pac Boot Resole | $125 | Rubber bottoms, liners, laces |
| Meindl Tessin Identity Resole | ~€90 | New soles, polish, innersole |
| Isaac Jackman (Ireland) | €95 for 2 pairs | Vibram soles, pressure clamping |
| SCARPA Official Resole | Not listed | Factory-trained repair, original materials |
New Boot Prices: $260–$320+
High-end hiking boots cost 2–3x the price of a resole. Even mid-range models exceed $200. For users with hard-to-fit feet, finding a replacement that matches comfort can take multiple tries—adding hidden cost.
When to Replace Instead
If resole cost exceeds 80% of a new pair’s price, replacement may make sense. Also consider resoling only if uppers are intact. Holes, tears, or collapsed support mean it’s time for new boots.
Top Professional Resole Services

Use trusted providers for durable, safe results.
SCARPA Factory Resole Service
SCARPA offers one of the most reliable programs. Send boots to Asolo, Italy, and their technicians resole with original materials. No receipt needed. Even if original soles are discontinued, SCARPA sources functionally identical replacements.
- Turnaround: Varies (mail time + repair)
- Best for: SCARPA hiking, mountaineering, and SKIMO boots
- Why choose it: Guaranteed performance, factory standards
Kenetrek Repair Center (Bozeman, MT)
Kenetrek’s Mountain Boot Resole Package ($175) includes new Vibram-style outsoles, performance insoles, laces, and minor repairs.
- Address: 96 Northstar Lane, Bozeman, MT 59718
- Shipping: You pay to send; return shipping free in U.S. only
- Processing time: 6–8 weeks
- Forms required: Resoling Service Form or Repair Evaluation Form
- Tip: Clean boots before sending—dirty boots incur fees
Meindl Manufacturer Resole
Meindl users report excellent results resoling Tessin Identity and similar models directly through the brand.
- Cost: ~€90
- Includes: Sole replacement, leather refurbishment, new insole
- Advantage: Superior to local cobblers for precision and material match
Isaac Jackman – Dublin, Ireland
Reputable cobbler known for resoling Merrell and Mindel hiking boots.
- Technique: Uses industrial adhesive, 48-hour cure, clamping pressure
- Sole type: Confirmed Vibram branding
- Total cost: €95 for two pairs
- Ideal for: European hikers avoiding international shipping
Rocky Mountain Resole
Recommended by long-distance hikers logging 1,500+ miles/year.
- Used for: Asolo GTX 520 and similar heavy-duty models
- Why trusted: Maintains broken-in fit and structural integrity
- Note: Not a mail-in service mentioned—likely regional provider
Nick’s in Spokane
Handles rugged work and hiking boots, including logging boots.
- Wait time: 3+ months
- Drawback: No insoles used due to over-built arch in leather construction
- Best for: Heavy-duty, full-leather boots only
DIY Resole: Risks and Temporary Fixes
Avoid full DIY resoles unless experienced. Most fail under real trail conditions.
Why DIY Often Fails
One user tried resoling Merrell boots with flexible shoe glue after a year in storage. The bond failed after 1–2 wet hikes due to:
- Inadequate surface prep
- Lack of clamping pressure
- Poor adhesive choice
Without proper tools and technique, DIY resoles won’t withstand moisture, flex, or weight.
McNett Freesole – Best Field Fix
For delaminated soles, McNett Freesole is the top temporary solution.
For Heel Delamination:
- Clean separation with alcohol pad
- Apply Freesole adhesive
- Clamp with weight (rock, water bottle) for 24+ hours
For Toe Delamination:
- Clean and dry gap
- Apply Freesole
- Wrap tightly with duct tape
- Insert pen or tent stake for internal pressure
- Cure at least 24 hours
This fix buys time but isn’t permanent. Get a professional resole as soon as possible.
Emergency Repairs: Seam Grip & Tape
Seam Grip and duct tape can stop small splits temporarily. Not suitable for load-bearing areas or long hikes. Use only to finish a trip, not as a long-term plan.
How to Prepare Boots for Resoling
Maximize repair success with proper prep.
Clean Thoroughly
Remove dirt, mud, and debris. Kenetrek charges extra for dirty boots. Use a stiff brush and mild soap. Never submerge leather boots.
Remove Insoles and Laces
Take out insoles and laces before shipping. This allows full access to the interior and prevents mold during transit.
Air Dry Completely
After cleaning or last hike, dry boots upside down at room temperature. Avoid heaters or direct sunlight—heat damages adhesives and shrinks leather.
Document Damage
Take photos of worn areas, delamination, or rips. Include with your service form to ensure accurate quotes and repairs.
Choose Boots Designed to Be Resoled
Buy smart from the start—pick models built for longevity.
Look for These Features
- Double-stitched welt construction
- Vibram® Montagna, TC5+, or equivalent replaceable soles
- Manufacturer-backed resole program (SCARPA, Kenetrek, Meindl, Asolo, Lowa, Zamberlan)
- Rubber rand protection (not bonded toe cap if you use wax)
Avoid These Red Flags
- Glued-only soles with no stitching
- No spare parts or repair support (e.g., Ecco hiking boots)
- Lightweight synthetic uppers that degrade faster than soles
Recommended Resoleable Brands
| Brand | Resole Support | Notes |
|---|---|---|
| SCARPA | ✅ Factory service | High reliability, original materials |
| Kenetrek | ✅ Full resole packages | U.S.-based, includes upgrades |
| Meindl | ✅ Send-in service | Trusted by European hikers |
| Asolo / Lowa / Zamberlan | ✅ Supported | Contact dealer for details |
| Ecco | ❌ Not resoleable | Adhesive-only bond, no repair path |
Maintain Boots to Maximize Resole Life
Proper care keeps uppers strong and repair-ready.
Keep Dry After Every Hike
Remove insoles and stuff with newspaper. Store upside down in a dry, ventilated area. Wet boots encourage mold and weaken adhesives.
Clean Regularly
Brush off dirt after each trip. Perform a deep clean once a year with mild detergent. Never machine wash.
Condition Leather Annually
Use silicone- or water-based conditioners (e.g., Aquaseal, Nikwax). Apply when leather looks dry or lightens in color. Avoid petroleum-based waxes on bonded-toe boots.
Never Use Heat to Dry
No heaters, radiators, or campfires. Heat warps soles, melts glue, and cracks leather. Patience is safer.
Store Properly
Keep in a cool, dry place with shoe trees or rolled socks to maintain shape. Avoid plastic bags—traps moisture.
Resole Early—Don’t Wait for Failure
Delaying resoling increases risk.
Prevent Water Ingress
Worn soles let water seep into the midsole. Once soaked, EVA foam breaks down and can’t be saved.
Stop Upper Damage
Delamination exposes stitching and leather edges to abrasion. Early resoling prevents tears and structural loss.
SCARPA’s Advice: Resole Before It’s Too Late
SCARPA recommends resoling before the boot shows major damage. Waiting until the midsole is exposed reduces repair options and may make resoling impossible.
Long-Term Value of Resoleable Boots
Think decades, not seasons.
Cost Over 20 Years
| Scenario | Total Cost |
|---|---|
| One €300 boot + 2 resoles at €90 | €480 over 20+ years |
| Replace every 5 years (4 pairs) | €1,200 over 20 years |
Resoleable boots offer 60% savings long-term. Plus, you keep the fit you love.
Environmental Impact
Manufacturing new boots consumes leather, rubber, energy, and transport resources. Resoling reduces waste and supports Reduce, Reuse, Repair, Recycle ethics. Brands like Kalipé and SCARPA promote this as “Long Life Design.”
Emotional Connection
Boots carry memories—summits, river crossings, thru-hikes. Climber Sean Villanueva wore resoled Kalipé boots across the Fitz Roy massif. For many, resoled boots are trusted companions, not just gear.
Final Tips for Successful Resoling
Get the best results with these proven strategies.
Use Manufacturer or Specialist Cobblers
Avoid general shoe repair shops. Choose SCARPA, Kenetrek, Meindl, or specialists like Isaac Jackman. They understand hiking boot performance needs.
Avoid Long Waits at Local Shops
Some cobblers have 3-month backlogs or unclear expertise. Look for shops that specialize in outdoor footwear, not just dress shoes.
Inspect Boots Regularly
Check soles every few hikes. Catch wear early. Take photos annually to track tread depth.
Weigh All Factors Before Replacing
Ask:
– Are uppers still strong?
– Is construction resoleable?
– Does brand offer repair support?
– Is resole cost under 70% of new price?
If yes to most, resole hiking boots.
Resoling isn’t just repair—it’s a commitment to sustainability, performance, and gear that grows with you. With the right boots and care, one pair can last a lifetime. Don’t replace what you can rebuild.