How to Transition From Walking Boot to Shoe
You’ve spent weeks in a walking boot, letting your foot or ankle heal from a fracture, sprain, or surgery. Now it’s time to step out, literally. But jumping straight into your regular shoes can undo healing and cause pain, swelling, or re-injury. The transition from walking boot to normal shoe must be gradual, structured, and guided by your body’s signals.
This process is not just about switching footwear. It’s about retraining your muscles, joints, and gait after prolonged immobilization. Without proper care, you risk stiffness, imbalance, and secondary issues in your knee, hip, or back. Most people need 2 to 6 weeks to safely wean off the boot, depending on injury type and healing progress.
In this guide, you’ll learn how to choose the right shoes, follow a step-by-step timeline, perform essential rehab exercises, and recognize warning signs. Whether you’re recovering from a metatarsal fracture, Achilles repair, or severe sprain, this plan ensures a smooth, safe return to normal walking.
Assess Healing Before Removing the Boot

Before stepping out of your boot, confirm that your injury is fully healed. Premature transition can lead to setbacks.
Confirm Bone and Tissue Healing
- Medical clearance is required. Your doctor must verify healing through clinical exams and imaging such as X-rays.
- For fractures (especially talus or calcaneus), healing can take 8 to 12 weeks. Do not begin transition until bone union is confirmed.
- After Achilles surgery, ensure all heel lifts have been removed from the boot and tendon length is stable.
Evaluate Readiness Signs
- No pain at rest or with light pressure
- Minimal swelling
- Able to bear full weight in the boot without discomfort
- Good ankle range of motion compared to pre-boot levels
If any of these are missing, delay the transition and consult your physiotherapist.
Follow a Gradual Weaning Schedule
A structured 2- to 6-week weaning protocol prevents overload and supports tissue adaptation.
Match Duration to Injury Severity
| Injury Type | Boot Duration | Transition Length |
|---|---|---|
| Mild sprain | 1–2 weeks | 1–2 weeks |
| Metatarsal fracture | 4–6 weeks | 2–4 weeks |
| Hindfoot fracture | 8–12 weeks | 4–6 weeks |
| Achilles repair | 6+ weeks | 4–6 weeks |
Rule of thumb: Longer immobilization = longer transition.
Use the 50% Step Rule
- Calculate your pre-injury daily step count using a fitness tracker if available.
- In the first two weeks, limit steps to 50% of normal.
- Example: If you normally walk 8,000 steps/day, aim for 4,000 to 6,000 during early transition.
- Increase by 10 to 15% every 3 to 4 days only if pain-free.
Choose Supportive Transition Shoes

The right shoe mimics boot support while allowing natural movement.
Key Features to Look For
- Cushioning: High-impact absorption (running shoes with gel or foam midsoles).
- Stability: Firm heel counter and midfoot support to prevent rolling.
- Rocker sole: Curved bottom reduces pressure on forefoot, ideal for stiff ankles or fractures.
- Slight heel drop: 8 to 12mm heel-to-toe difference helps ease Achilles and calf strain.
Recommended Shoe Types
- Running trainers with motion-control features
- Walking shoes with structured support
- Hiking boots for added ankle support in early stages
- Orthopedic shoes with removable insoles to fit custom orthotics
Avoid These Footwear Types
- Flip-flops or sandals (no support)
- High heels (increases forefoot load)
- Flat ballet flats or minimalist shoes (lack cushioning)
- Work boots with rigid soles (may limit motion)
Use Heel Lifts and Orthotics

Support devices bridge the gap between boot and flat shoe.
Add Heel Lifts When Needed
- If your boot elevated your heel, a sudden drop to flat ground strains the Achilles.
- Insert a 1/4″ to 1/2″ heel lift into your new shoe to match boot height.
- Gradually reduce lift thickness over 2 to 3 weeks as tolerated.
Wear Custom or OTC Insoles
- Orthotics distribute pressure, support arches, and reduce strain on healing bones.
- Use over-the-counter options or get custom-molded inserts.
- Replace boot insoles with your orthotic for better alignment.
Try Compression Socks for Swelling
- Wear during the day to manage edema.
- Choose graduated compression (15 to 20 mmHg).
- Remove at night unless advised otherwise.
Start with Indoor Walking Only
Begin weight-bearing in a safe, controlled environment.
Week 1: Acclimate at Home
- Walk only indoors on flat, non-slip surfaces such as hardwood or carpet.
- Start with 5 to 10 minute sessions, 2 to 3 times per day.
- Wear your supportive shoe with orthotics and heel lift.
- Focus on heel-to-toe gait and avoid limping or toe-walking.
Monitor for Warning Signs
- Stop if you feel:
- Sharp or increasing pain
- Swelling that worsens
- Instability or “giving way”
- If symptoms occur, return to the boot and rest 2 to 3 days before retrying.
Progress to Short Outdoor Walks
Once comfortable indoors, test outdoor terrain carefully.
Week 2: Begin Controlled Exposure
- Walk outside for 10 to 15 minutes on even pavement or track.
- Avoid uneven ground, gravel, or hills initially.
- Stick to familiar routes with places to rest.
Increase Gradually
- Add 10 minutes per day only if no pain or swelling the next morning.
- Example progression:
- Day 1: 10 minutes
- Day 3: 20 minutes
- Day 6: 30 minutes
- Use a pedometer or phone app to track steps and distance.
Focus on Gait Re-Education
- Many people develop a limp or altered stride in the boot.
- Practice walking with:
- Heel strike → midfoot roll → toe push-off
- Equal step length on both sides
- A physical therapist can provide real-time feedback.
Rehabilitate Strength and Mobility
Physical therapy reverses muscle loss and joint stiffness from immobilization.
Restore Range of Motion
- Ankle circles: 10 clockwise, 10 counterclockwise, 2 to 3 times daily
- Alphabet tracing: Move foot to “write” A through Z in the air
- Towel stretches: Sit with leg straight, loop towel around ball of foot, gently pull back for 30 seconds
Rebuild Calf and Foot Strength
- Theraband exercises:
- Plantarflexion (push foot down)
- Dorsiflexion (pull foot up)
- Inversion and eversion (side-to-side)
- 2 sets of 15 reps daily
- Heel raises: Start double-leg, progress to single-leg as able
- Toe curls: Pick up marbles or towel with toes to improve intrinsic foot strength
Improve Balance and Proprioception
- Single-leg stand: Hold 30 seconds, eyes open, then eyes closed
- Bosu ball or pillow standing: Increases instability training
- Heel-to-toe walk: Walk in a straight line, heel to toe, for 20 steps
Begin these exercises during boot use if allowed, and intensify after transition.
Use Ankle Braces as a Bridge
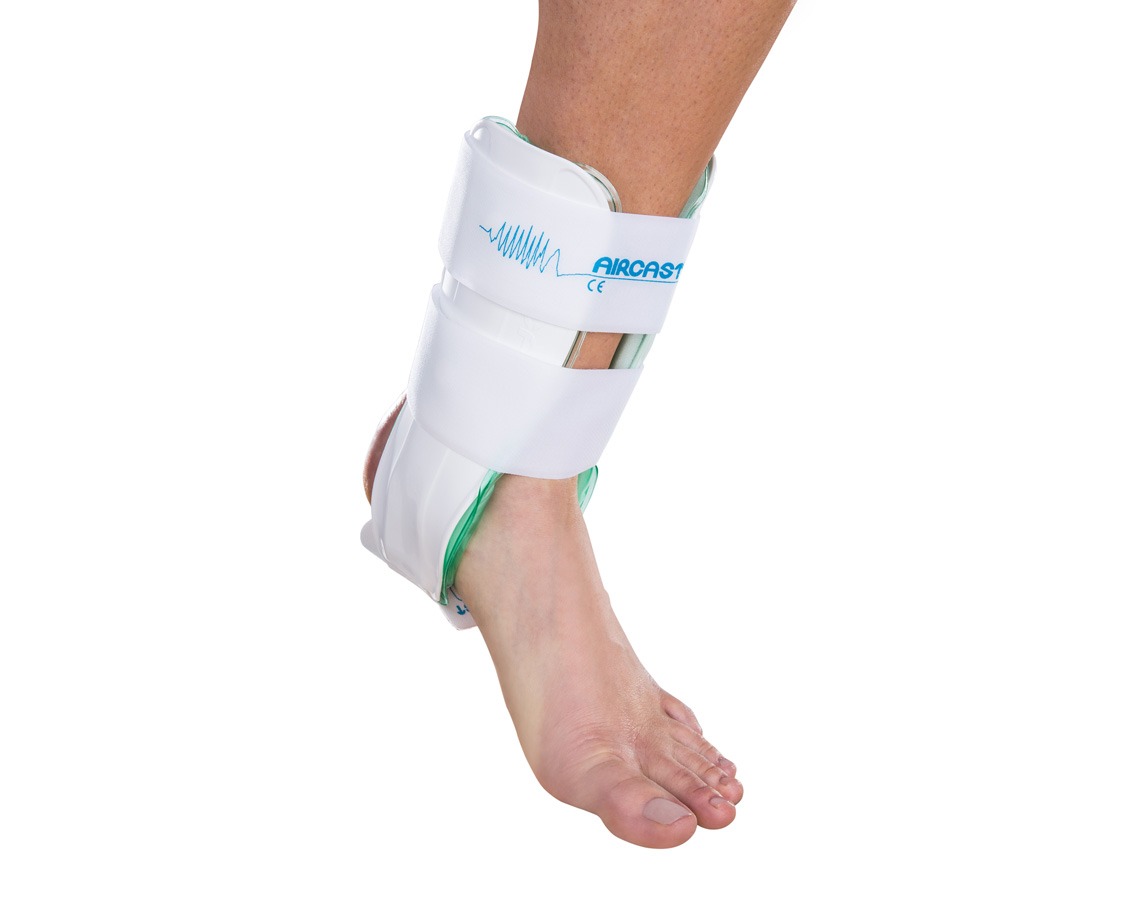
For extra support, wear a brace instead of jumping straight to bare shoes.
Select the Right Brace for Your Injury
| Brace Type | Best For | Key Benefit |
|---|---|---|
| Aircast Air-Stirrup Universal | Acute injury, post-op | Swelling control, rigid support |
| Aircast AirSport | Sport return, mild sprains | Dynamic stability with movement |
| Bauerfeind MalleoLoc | Ligament damage, instability | Prevents inversion/eversion |
| Donjoy Elastic Support | Late-stage recovery | Light compression and warmth |
- Wear during longer walks, sports, or on uneven terrain.
- Gradually reduce brace use over 2 to 4 weeks as confidence and strength improve.
Know When to Drive Again
Returning to driving requires strength, coordination, and safety.
Criteria for Safe Driving
- Fully out of the boot
- Wearing a supportive shoe
- Able to perform an emergency stop quickly and without pain
- No reliance on pain medications that impair reflexes
Special Considerations
- Right-foot injury: Wait longer, as braking response time is critical.
- Manual transmission: Must safely operate clutch and brake.
- Check with your doctor and insurer since some policies require clearance.
Most patients resume driving 2 to 6 weeks after boot removal, depending on recovery.
Watch for Warning Signs
Not all discomfort is normal. Know when to pause and seek help.
Normal Symptoms (Expected)
- Mild stiffness in the morning
- Slight swelling after activity
- Minor aching that resolves with rest
Manage with:
* Ice for 15 minutes post-walk
* Elevation above heart level
* Compression socks
Red Flags (Seek Medical Advice)
- Increasing pain that doesn’t improve with rest
- Worsening swelling or redness
- Warmth or fever around the joint (possible infection)
- Numbness or tingling (nerve concern)
- Instability or inability to bear weight
Action: Stop transition, return to the boot, and contact your doctor immediately.
Injury-Specific Transition Tips
Tailor your approach based on your diagnosis.
Metatarsal Fracture (e.g., 5th Metatarsal)
- Transition begins at weeks 4 to 6
- Use cushioned shoes with rocker soles to offload the forefoot
- Avoid running or jumping for at least 8 weeks post-boot
- If pain returns, regress to previous stage for 1 to 2 weeks
Hindfoot Fracture (Talus, Calcaneus)
- Healing is slow, so do not rush.
- Begin with 1 to 2 weeks of indoor-only walking
- Use heel cushions and rocker-bottom shoes
- High risk of stiffness: commit to daily ROM exercises
Achilles Tendon Repair
- Transition starts only after heel lifts are fully removed from boot
- Wear a shoe with 12 to 14mm heel drop initially
- Use heel lift inside shoe and taper down over 2 to 3 weeks
- Avoid barefoot walking or flat shoes for at least 6 weeks
Ankle Sprain (Grade 1–3)
- Mild sprains: May transition immediately after boot
- Severe/high ankle sprains: Require 2 to 4 week weaning
- Wear ankle brace during sports for 4 to 6 weeks post-transition
- Focus on balance training to prevent re-injury
Maintain Gains and Prevent Re-Injury
Once in normal shoes, keep building strength and awareness.
Continue Rehab Exercises
- Perform strengthening and balance drills 2 to 3 times per week indefinitely.
- Include calf raises, single-leg stands, and resistance band work.
Gradually Return to Running and Sport
- Only after 4 to 6 weeks of pain-free walking
- Start with walk/run intervals (e.g., 1 minute run, 2 minutes walk)
- Increase run time by 10% per week
- Use an anti-gravity treadmill if available for low-impact conditioning
Wear Supportive Shoes Daily
- Avoid going barefoot or wearing unsupportive shoes at home
- Choose supportive slippers or recovery sandals
Frequently Asked Questions About Transitioning from a Walking Boot
How long does the entire transition process take?
For standard fractures, the weaning process takes about 2 weeks. For complex cases, surgery recovery, or long-term immobilization, it can take 4 to 6 weeks. Full return to sport may take months.
Can I drive while transitioning out of the boot?
Only when you are completely out of the boot, wearing a supportive shoe, and can perform an emergency stop safely. For right-foot injuries or manual cars, consult your doctor and insurer first.
Is swelling normal after removing the boot?
Yes. Swelling is common and can persist for a while. Manage with compression socks, elevation, and ice. If swelling worsens or is accompanied by redness or heat, seek medical advice.
Do I really need physiotherapy during the transition?
Strongly recommended. Physiotherapy is critical to reverse muscle wasting, restore range of motion, and guide a safe return to activity, especially after long immobilization or surgery.
What if I feel pain during the transition?
Pain is a signal to slow down. Reduce your step count, shorten your walking time, or return to the previous stage (or the boot) until the pain settles. Do not push through sharp or increasing pain.
What shoes should I wear first after the boot?
Choose a stable, cushioned running or walking shoe with midfoot support, rocker soles, and a slight heel drop. Avoid sandals, flats, high heels, and rigid work boots.
Key Takeaways for Transitioning from Walking Boot to Normal Shoe
The transition from walking boot to normal shoe is not a finish line; it’s a bridge to full recovery. Rushing it risks setbacks while respecting it ensures lasting healing. Follow a gradual 2- to 6-week plan, wear supportive footwear, use orthotics and heel lifts as needed, and commit to rehab exercises. Listen to your body: pain is a signal, not a challenge.
Your next step: schedule a check-in with your physiotherapist this week to confirm healing and get personalized guidance on your weaning timeline.