How to Wash Hiking Boots: Easy Cleaning Guide
You’ve just finished a tough trail—mud splattered up to the laces, soles packed with dirt, and a faint damp smell lingering inside. Your instinct might be to toss your hiking boots in the sink, scrub them hard, or even throw them in the washing machine. But doing so could shorten their life by years. Knowing how to wash hiking boots properly isn’t just about cleanliness—it’s about preserving performance, safety, and investment. Whether you’re wearing full-grain leather, synthetic mesh, or GORE-TEX-lined boots, one-size-fits-all cleaning can damage waterproof membranes, warp soles, or crack leather. This comprehensive guide walks you through the correct, material-specific way to clean, dry, deodorize, and re-waterproof your hiking boots—so they’re ready for every future adventure.
Remove Laces and Insoles Before Cleaning
Always begin cleaning by taking out the laces and insoles. This allows full access to hidden grime, speeds up drying, and prevents trapped moisture from causing odor or mold.
Clean Insoles and Laces Separately
Rinse insoles under lukewarm water and wipe with a damp cloth and mild soap. For stubborn odor, soak them in a 4:1 water-to-vinegar solution for 10 minutes, then air dry completely—never use a dryer. If your insoles are fabric and labeled machine-safe, wash at 30°C on a gentle cycle. Laces can be scrubbed with a toothbrush and mild soap, then rinsed and laid flat to dry.
Pro Tip: Replace insoles every 6–12 months, especially if they’ve lost cushioning or still smell after cleaning.
Brush Off Loose Dirt and Debris First
Start with a dry clean to avoid turning dried mud into a slurry. Work outdoors or over a trash can to contain the mess.
Use the Right Brushes for Each Job
- Stiff-bristled brush: Knock off caked mud from soles and uppers.
- Soft-bristle brush (nylon or horsehair): Gently remove dust from fabric or delicate leather.
- Old toothbrush: Clean around eyelets, seams, and deep treads.
Tap boots together to loosen grit stuck in lugs. The goal is to remove as much dry debris as possible before introducing water.
Wash the Exterior Based on Boot Material

Different materials require different care. Using the wrong method can strip waterproofing, degrade adhesives, or ruin the finish.
Clean Leather Boots the Right Way
For full-grain leather, lightly dampen the surface and use saddle soap or Nikwax Leather Cleaner with a soft cloth. Never soak leather—this can cause it to lose shape and crack when drying. Avoid dish soap, which strips natural oils.
Warning: If your boots have a SimpaTex membrane, clean only with water—soap can compromise water repellency.
Care for Nubuck and Suede Uppers
These delicate finishes need special attention. Use a nubuck brush or eraser to lift dirt. Apply Nikwax Nubuck & Suede Cleaner with a sponge in small sections. Avoid soaking—water spots and darkening are common. Let dry completely before brushing the nap back up.
Wash Synthetic and Hybrid Boots Safely
Synthetic uppers can handle more water. Rinse under a tap and use a 1:5 mix of mild dish soap and water with a soft brush. Focus on seams and mesh panels. Avoid harsh scrubbing that could damage DWR (Durable Water Repellent) coatings.
Expert Note (Granger’s): “Technical cleaners preserve DWR without clogging fibers—ideal for synthetic hiking boots.”
Handle Waterproof Boots with Extra Caution
Boots with GORE-TEX or eVent can be rinsed, but never machine washed. Use Nikwax Footwear Cleaning Gel or a similar specialist product. Never use laundry detergent—its chemicals can break down membranes. For SimpaTex models, stick to water-only cleaning.
Clean the Interior Without Damaging the Lining
The inside of your boots is vulnerable. Harsh cleaning can ruin linings and worsen odor.
Wipe, Don’t Scrub the Inside
Use a damp sponge or lint-free cloth with lukewarm water. Never use soap—residue attracts bacteria and causes persistent smells. For mold or odor, wipe with a 4:1 water-to-vinegar solution, then air dry thoroughly.
Deodorize Naturally and Effectively
Sprinkle 1–2 tablespoons of baking soda inside and leave overnight, then shake out. For long-term odor control, place a coffee filter or sock filled with baking soda inside between uses. Use a shoe hygiene spray like Granger’s Odour Eliminator for quick refreshes.
Pro Tip (Christian Wittig, HANWAG): “You can condition leather linings with unscented hand cream—just avoid perfumes or alkanes.”
Clean the Soles to Restore Traction
Mud-packed lugs reduce grip and wear down rubber faster.
Remove Wet Mud Quickly
Knock boots together to loosen debris. Use fingers or a toothbrush to clean treads, then rinse under running water.
Loosen Hardened Mud Safely
Soak boots in shallow lukewarm water for up to 2 hours. Add a drop of mild soap if needed—but don’t submerge non-waterproof boots. Use a dull tool (key, spoon, or plastic pick) to pry out caked mud.
Never use sharp objects—they can slice rubber or damage lug patterns.
Dry Hiking Boots the Right Way
Improper drying is the leading cause of boot failure. Heat can melt glue, warp soles, and crack leather.
Air Dry Only—Never Use Heat
Avoid radiators, hairdryers, sunlight, or tumble dryers. Heat risks:
– Warping rubber soles
– Melting adhesives
– Cracking leather
– Damaging waterproof membranes
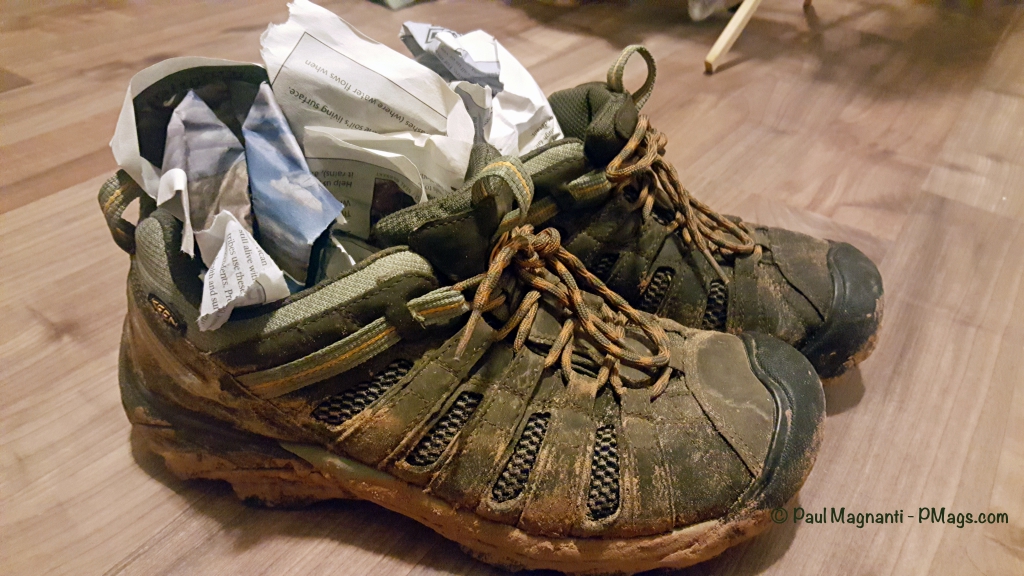
Stuff with Newspaper to Speed Drying
Use black-and-white newspaper (colored ink can bleed onto light linings). Crumple and pack tightly to absorb moisture and maintain shape. Replace every 2–4 hours as it becomes damp.
Avoid paper towels—they hold less moisture and are less effective.
Speed Up Drying Without Damage
Place boots in a well-ventilated room at room temperature. Use a fan to increase airflow—cuts drying time by 30–50%. For frequent hikers, consider a low-heat boot dryer like DryGuy or Peet.
Drying time: 12 to 72 hours, depending on conditions.
Expert Tip (Shannon Elliott, Columbia): “Store your hiking shoes out in the open air in a dry place—not in sunlight.”
Re-Waterproof After Every Deep Clean
Cleaning removes the DWR coating. Reapplying it restores water resistance and breathability.
When to Re-Waterproof
- After every deep clean
- When water stops beading on the surface
- Before long hikes or seasonal storage
Apply While Boots Are Slightly Damp
Key Insight (Shannon Elliott, Columbia): “For best results, apply waterproofing when boots are slightly damp—not dry.”
Moisture opens fibers, allowing better penetration of the treatment.
Choose the Right Product for Your Boot Type
| Boot Type | Recommended Treatment |
|---|---|
| Synthetic/Fabric | Nikwax Fabric & Leather Spray, Grangers Fabsil |
| Full-Grain Leather | Nikwax Waterproofing Wax, HANWAG Shoe Wax |
| Nubuck/Suede | Nikwax Nubuck & Suede Spray |
| Hybrid Boots | Dual-purpose spray for both materials |
Step-by-Step Waterproofing Application
- Ensure boots are clean and slightly damp.
- Shake the spray can well.
- Hold 30 cm (12 inches) from the boot.
- Spray evenly, focusing on high-wear zones: toe cap, seams, lacing areas.
- Use a cloth to spread excess.
- Let dry for 12–24 hours.
- For leather, apply a conditioner (e.g., Nikwax Liquid Conditioner) before wax.
Avoid grease or oil—they block pores and reduce breathability.
Restore Nubuck and Suede Texture
After spraying, gently brush the surface with a suede brush to lift the nap and restore the soft, velvety finish.
Perform Monthly Boot Inspections
Catch small issues before they become trail failures.
Check for Common Damage
- Uppers: Look for tears, scuffs, or separated seams. Patch minor rips with Tenacious Tape; seek repair for major damage.
- Soles: Inspect for cracks, peeling rubber, or worn lugs. Repair with Gear Aid Aquaseal SR or consider resoling.
- Laces and eyelets: Replace frayed laces; check for rust.
Pro Tip: Brands like Salomon and Vasque offer affordable resole services.
Store Boots to Maximize Longevity
Improper storage causes more damage than hiking itself.
Ideal Storage Conditions
- Cool, dry, ventilated area—avoid attics, basements, or garages.
- Out of sunlight—UV rays degrade adhesives and fade colors.
- Unlaced with tongue open—maintains shape and airflow.
- Use shoe trees—cedar or wood versions absorb moisture and deter odors.
Protect from Dust and Pests
Store in a breathable boot bag or cardboard box with ventilation holes.
Never use plastic bags—they trap moisture and invite mold.
Expert Advice (CleverHiker.com): “Avoid compression—don’t store boots squished under gear.”
Avoid These Common Cleaning Mistakes
Even experienced hikers make these errors—don’t let them ruin your boots.
Never Machine Wash or Dry
Washing machines destroy adhesives and membranes. Dryers use heat that warps soles and cracks leather. No exceptions—even “gentle” cycles are too harsh.
Don’t Use Hot Water or Harsh Chemicals
Hot water can shrink leather and loosen glue. Bleach, solvents, or strong detergents break down DWR and fabrics.
Avoid Soaking Leather or Non-Waterproof Boots
Waterlogged leather loses shape and risks mold. Non-waterproof boots absorb water that can’t escape, damaging internal layers.
Don’t Waterproof Dirty or Dry Boots
Dirt blocks treatment absorption. Dry boots won’t let DWR penetrate.
Always clean first, then apply while damp.
Follow the 5 Golden Rules of Hiking Boot Care
Stick to these principles to keep your boots performing for years.
- Clean after every hike—remove mud, debris, and sweat.
- Dry at room temperature—use newspaper and airflow; never use heat.
- Re-waterproof regularly—after every clean, apply while damp.
- Condition leather boots—use wax every 2–3 hikes to prevent cracking.
- Store unlaced and ventilated—keep them open, upright, and out of compression.
Final Note: Properly washing hiking boots takes a little time, but it pays off in comfort, safety, and longevity. By following these material-specific steps—cleaning the right way, drying safely, and re-waterproofing regularly—you’ll keep your boots trail-ready for every adventure. Whether you’re a weekend hiker or a long-distance trekker, a few minutes of care after each hike can extend your boot life by years. Treat your boots well, and they’ll carry you farther.