How to Choose Winter Hiking Boots
Winter hiking is as beautiful as it is unforgiving. One wrong step—or one poor gear choice—can turn a peaceful trek through snow-laden forests into a miserable, even dangerous experience. At the heart of your winter hiking setup? Your boots. More than any other piece of gear, how to choose winter hiking boots determines whether your feet stay warm, dry, and stable on icy trails or suffer from blisters, numbness, or slips. With so many models touting “extreme warmth” or “unbeatable grip,” it’s easy to get overwhelmed. But the truth is simple: the best winter hiking boot isn’t the warmest or most rugged—it’s the one perfectly matched to your activity, terrain, and conditions.
This guide cuts through marketing hype with real-world testing data, expert insights, and user feedback to help you make a smart, confident decision. Whether you’re tackling deep powder, snowshoeing on packed trails, or navigating icy sidewalks, you’ll learn exactly what to look for—and what to skip.
Match Boots to Your Winter Activity
Your hiking style should dictate your boot choice. Winter hiking isn’t one-size-fits-all: a boot ideal for snowshoeing may overheat on a fast-paced trail, while a lightweight urban boot will fail in deep snow.
Identify Your Primary Use Case
Before you even look at specs, ask: What will I actually be doing? Here’s how different activities shape your boot needs:
- General winter hiking (10°F–40°F): Mid-cut boots with 200g insulation, waterproof membrane, and aggressive tread
- Snowshoeing: Stiff sole, microspike compatibility, ankle support
- Hunting or bushwhacking: High cuff, durable upper, crampon-ready
- Urban or light trail use: Breathable, lightweight, stylish design
- Extreme cold (below 0°F): 400g+ insulation, aerogel zones, gaiter integration
Choosing based on activity prevents overheating, fatigue, or inadequate protection.
Avoid Over-Insulating for Active Hikes
More insulation doesn’t mean better performance. 200g is ideal for moving hikes in 10°F–40°F. 400g suits low-activity scenarios like ice fishing or static observation.
Key Insight: “Insulation in mild snow just makes your socks a sauna. What keeps feet warm is dryness—good waterproofing and breathable lining.” — User feedback
Overheating leads to sweat buildup, damp socks, and increased frostbite risk. Prioritize breathability when hiking hard.
Choose the Right Insulation Level and Type
Insulation keeps your feet warm, but type and amount must align with your activity level.
Pick the Right Warmth Tier
- 200g insulation: Best for active hiking and snowshoeing (e.g., Salewa Puez Winter Mid, Merrell MTL Thermo Rogue 4 Mid)
- 400g insulation: For extreme cold or minimal movement (e.g., Hoka Kaha 2 Frost GTX, Columbia Expeditionist Extreme)
- Reflective liners (Omni-Heat, aluminum weave): Add warmth without bulk—ideal for breathability
Avoid 400g boots for long hikes—they’re overkill and reduce breathability.
Compare Insulation Technologies
| Type | Benefits | Best For |
|---|---|---|
| Primaloft Gold | Lightweight, retains warmth when wet | Active hikers |
| Gore Duratherm | High warmth, durable | Cold-weather expeditions |
| Aerogel (Merrell, Hoka) | Ultra-thin, high-efficiency zones | Toe and forefoot warmth |
| Recycled polyester (Salomon) | Eco-friendly, moderate warmth | Urban and light trail |
| Reflective liners | Reflect body heat, reduce bulk | Breathable warmth |
Pro Tip: Layer smartly—pair moderately insulated boots with quality merino socks instead of relying solely on boot insulation.
Demand Reliable Waterproofing
Wet feet in winter are dangerous. A waterproof membrane is non-negotiable.
Know the Best Waterproof Membranes
- Gore-Tex (GTX): Industry standard, highly breathable, durable
- Powertex (Salewa): PFAS-free, passed 40-minute icy river test
- Omni-Tech (Columbia): Effective in slush and wet snow
- OutDry™ (Columbia): Direct-laminated for better breathability
- PFC-Free Gore-Tex (Scarpa): Eco-conscious, high performance
Avoid boots with only water-resistant leather—they fail in deep snow or slush.
Test for Real-World Performance
One brand, Salewa, proved its Powertex membrane by fully submerging the Puez Winter Mid in icy water for 40 minutes with zero leakage. This level of real-world validation matters.
Expert Verdict: “We’re sticklers about moisture—wet, cold feet can end your hike—or worse.” — Testing team
Maximize Traction on Snow and Ice
Slipping on ice is a top winter hazard. Your boot’s outsole must deliver.
Look for Cold-Weather Rubber Compounds
Standard rubber hardens in freezing temps. Winter boots need cold-flexible compounds:
- Vibram Arctic Grip: Superior wet-ice traction
- Omni-Grip Ice (Columbia): Optimized for icy trails
- Adapt Trax (Columbia): Snow and ice-focused tread
- Vibram outsoles (Mammut, Scarpa, Lacrosse): Durable, multi-terrain grip
These materials stay pliable and grippy even at -20°F.
Evaluate Lug Design
Not all treads are equal. Effective winter lugs:
- Are deep and widely spaced to shed snow
- Feature aggressive toe and heel zones for climbing and braking
- Use terraced, tooth-lined 5mm lugs (Merrell) for packed snow
Reality Check: “No outsole grips like crampons. On glare ice, traction aids are essential.” — Expert insight
Even the best rubber needs help on sheer ice.
Ensure Perfect Fit and Comfort
A poorly fitting boot ruins any hike—no matter how warm or grippy.
Follow Fit Best Practices
- Try boots late in the day—feet swell with use
- Wear your hiking socks during fitting (e.g., Smartwool, Darn Tough)
- Check toe space: ⅓ to ½ inch between longest toe and boot end
- Test heel lock: No slippage when walking downhill
- Consider width: Brands like Oboz offer wide sizes
Expert Rule: “Boots should be comfortable out of the box—no hot spots, pinching, or rubbing.” — User review
Modern boots shouldn’t require a painful break-in.
Choose the Right Midsole
- EVA (Ethylene-Vinyl Acetate): Lightweight, shock-absorbing, stable in storage
- PU (Polyurethane): More durable but degrades over time due to hydrolysis
Avoid PU if storing boots long-term.
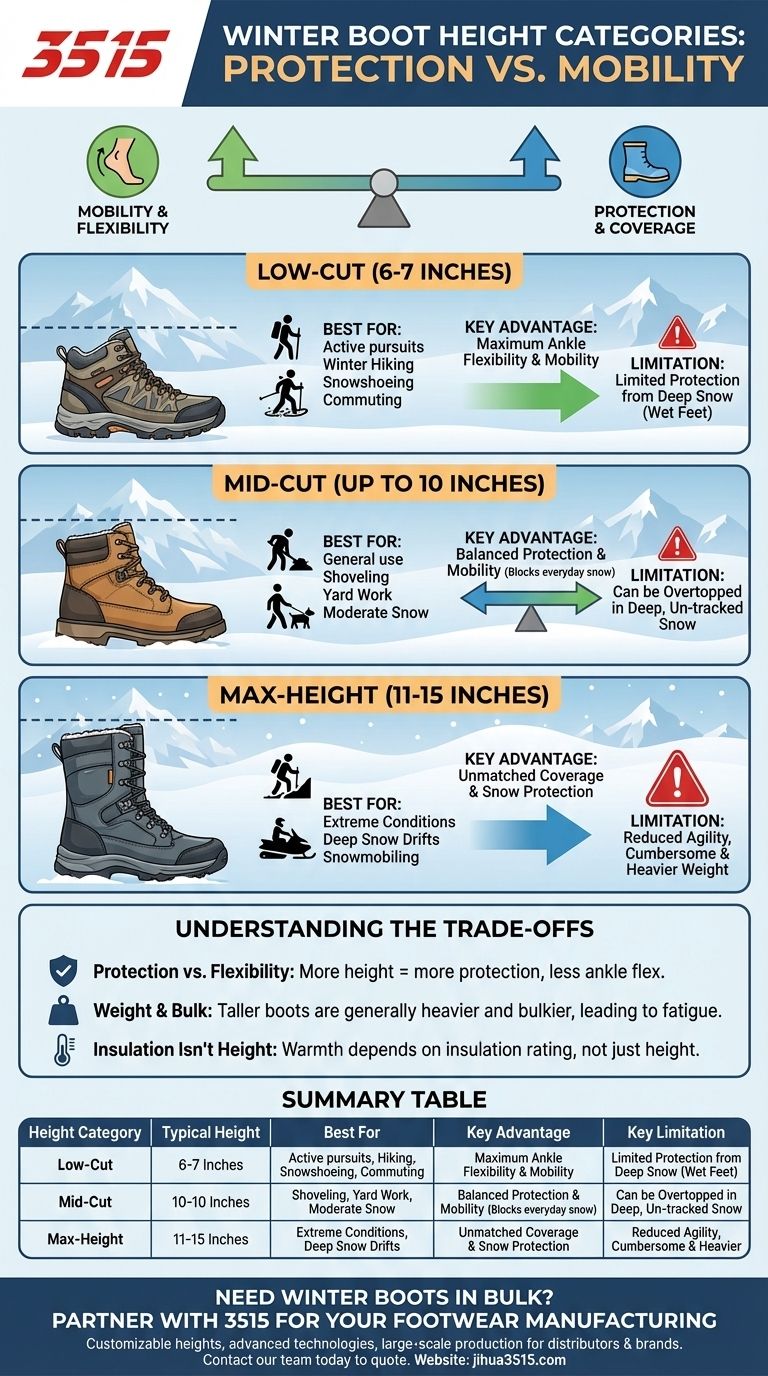
Select the Right Cuff Height
Cuff height affects snow protection, stability, and mobility.
Mid vs. High Cuff: What’s Best?
| Cuff Type | Best For | Trade-Offs |
|---|---|---|
| Mid (4–6″) | General hiking, snowshoeing | Less snow protection in deep powder |
| High (7–10″) | Deep snow, bushwhacking | Heavier, less agile |
| Low (under 4″) | Urban use, light trails | Poor snow sealing |
The Salomon X Ultra Snowpilot’s 4-inch cuff failed to block deeper snow—proving height matters in powder.
Pair with Gaiters for Full Protection
Even mid-cuff boots benefit from full-length gaiters in deep snow. They seal out snow, mud, and debris.
Pro Tip: “Gaiters are a game-changer—they turn a mid-cut boot into a high-performance system.” — Field tester
Balance Weight and Performance
Heavier boots offer durability but increase fatigue.
Lightweight Options (Under 2 lbs per boot)
- Salewa Puez Winter Mid: 1 lb (men’s 10), fast and agile
- Merrell MTL Thermo Rogue 4 Mid: 1.3 lbs, responsive for snowshoeing
Ideal for speed hiking, fastpacking, or long days.
Moderate to Heavy Boots (2–4 lbs)
- Hoka Kaha 2 Frost GTX: Cushioned, warm, great for long hikes
- Meindl Air Revolution Alpine Pro 200: 3.8 lbs per pair, rugged and durable
- Lacrosse Ursa LS GTX: 3.8 lbs, built for extreme conditions
Best for stability, support, and harsh terrain—but harder on endurance.
Trade-off: Every extra ounce multiplies fatigue over miles. Choose weight based on hike length and terrain.
Check Compatibility with Traction Devices
Most winter trails require microspikes or crampons.
Microspike Compatibility
- Most winter boots work with Kahtoola MICROspikes or Black Diamond models
- Ensure heel and toe bails can secure the device
- Hoka Kaha 2 Frost GTX required sizing up due to extended heel brake
Test fit before buying.
Crampon Compatibility
- Requires stiff soles and precise heel/toe welts
- Meindl Air Revolution Alpine Pro 200 is explicitly crampon-compatible
- Most hiking boots are not crampon-safe
Critical Note: “You can’t use crampons with most ‘hiking boots.’” — Mountaineering user
For alpine or glacier travel, choose boots rated for technical use.
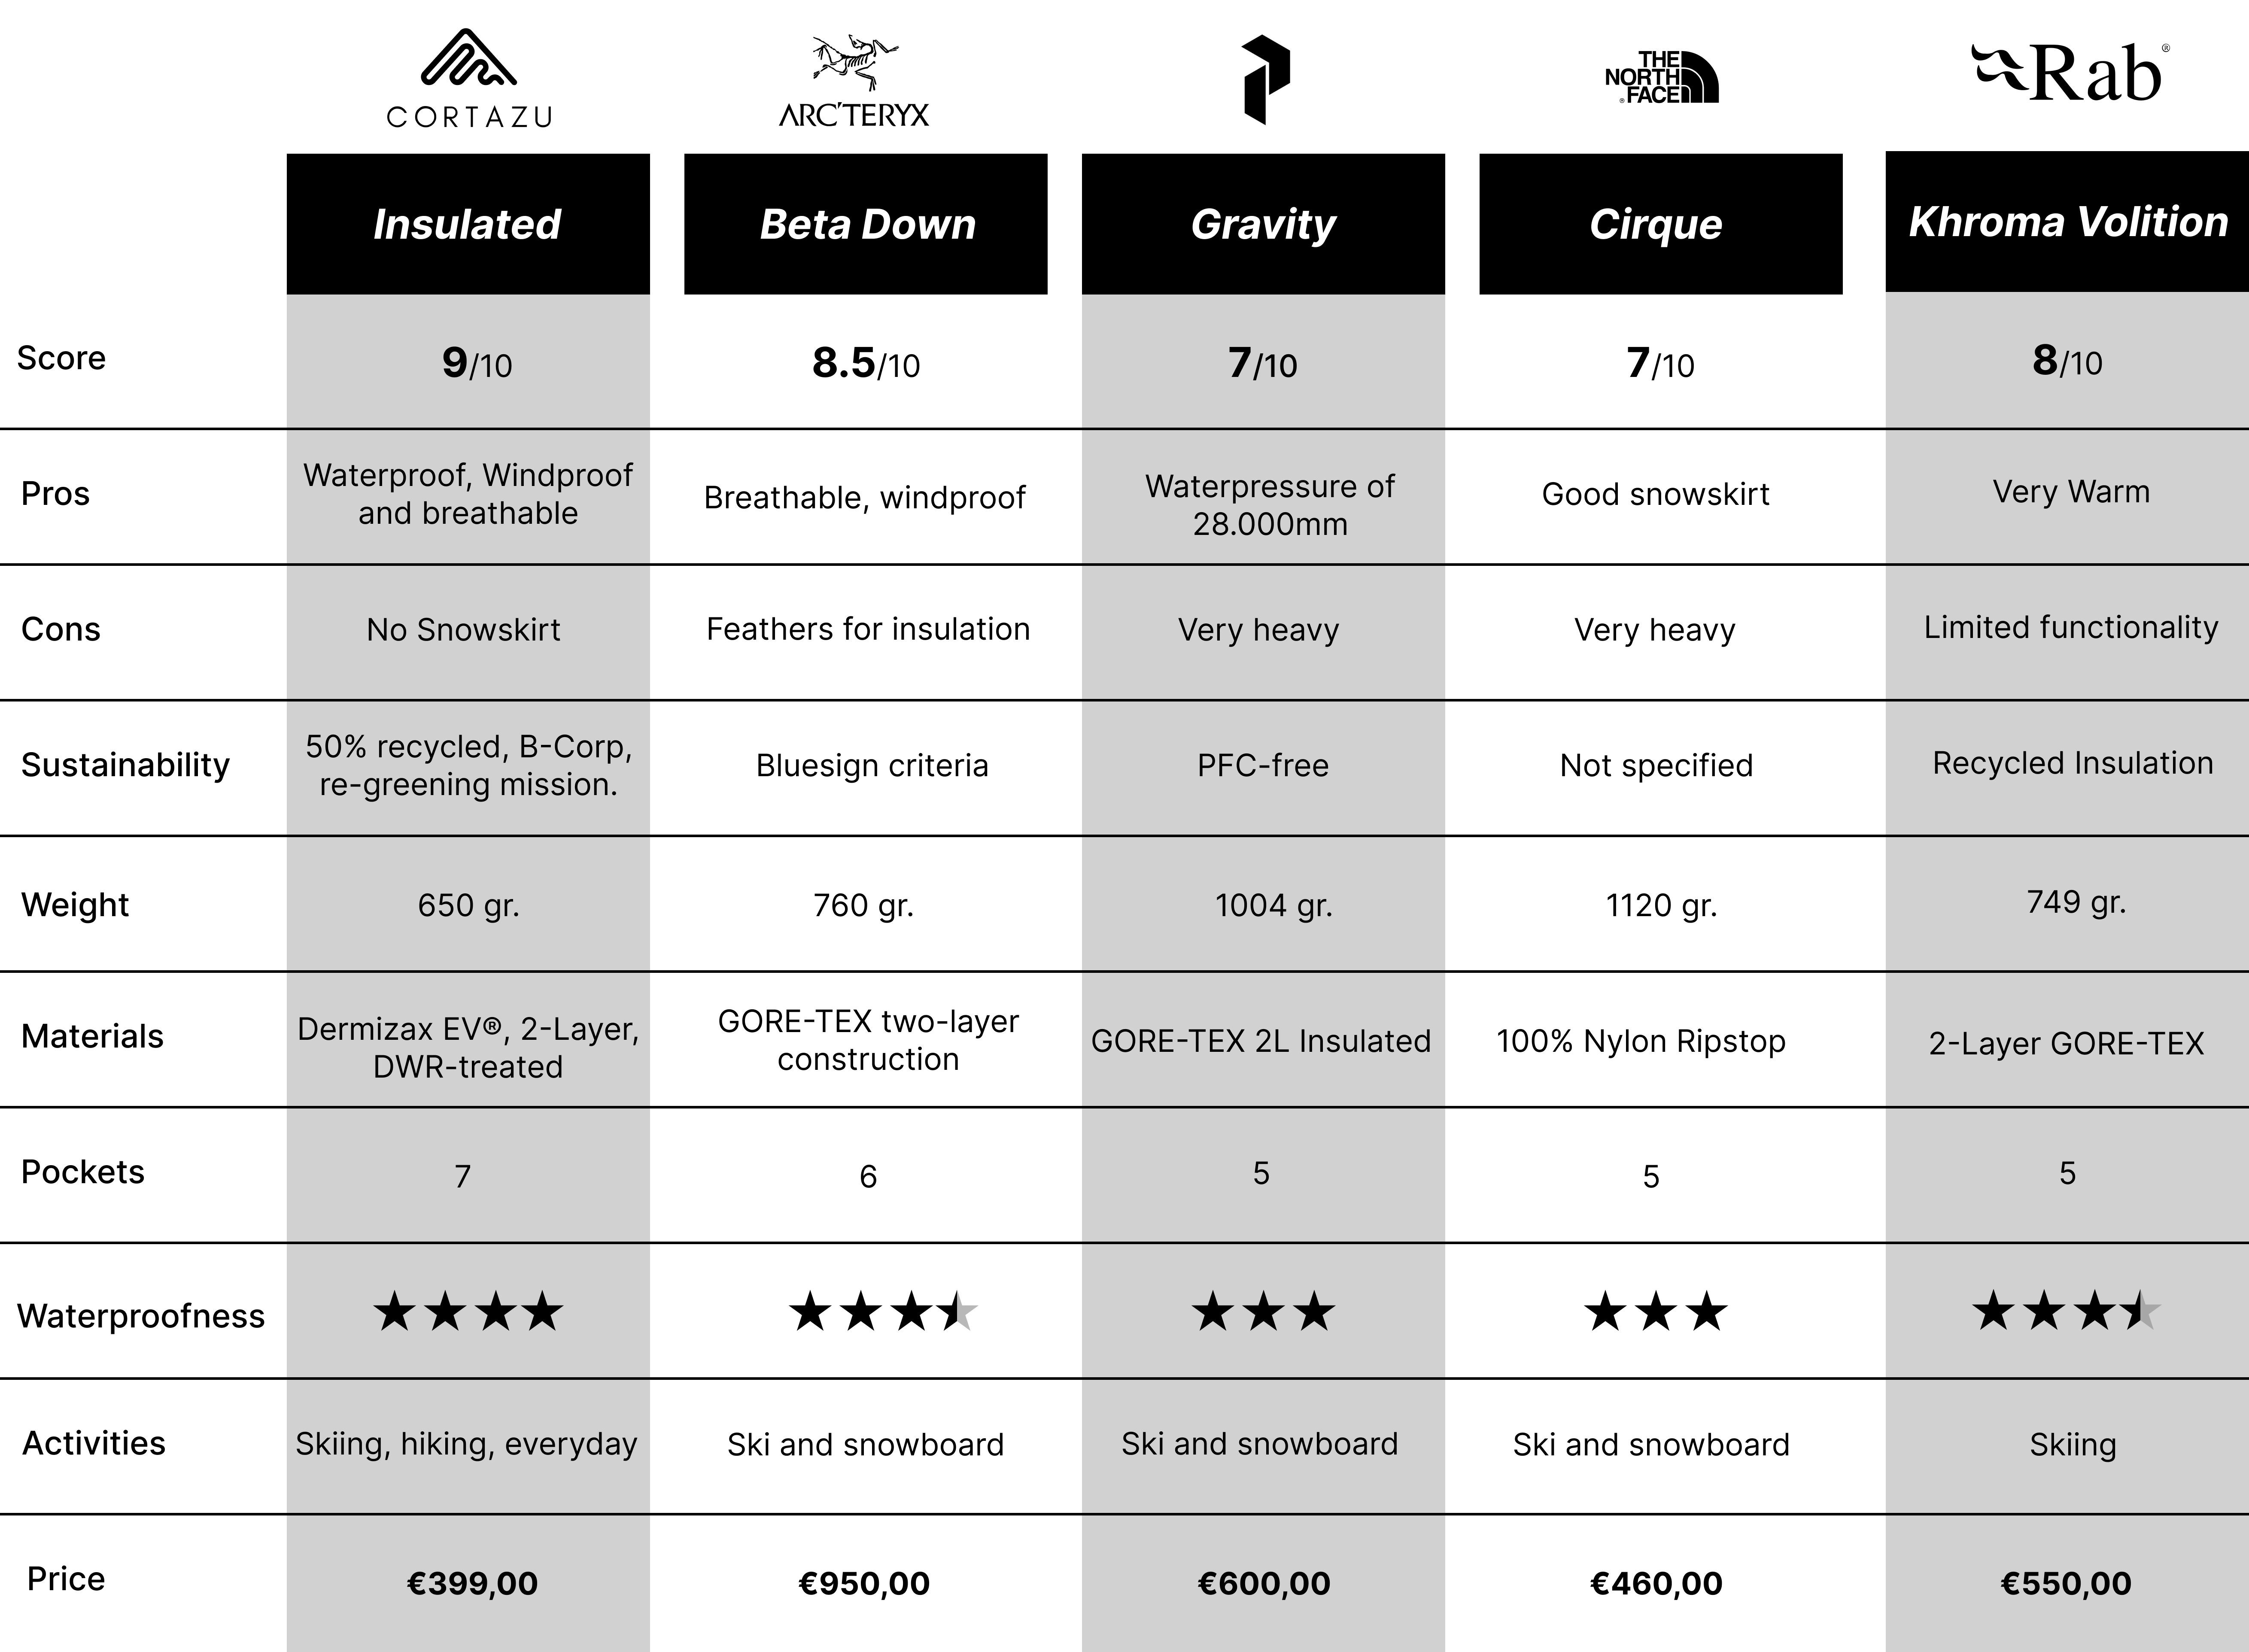
Compare Top Brands and Models

Not all brands deliver equal performance. Here’s what real-world testing shows.
Top Brands by Use Case
| Brand | Best For | Standout Model | Why It Shines |
|---|---|---|---|
| Salewa | Lightweight, fast hiking | Puez Winter Mid Powertex | No break-in, excellent grip, PFAS-free waterproofing |
| Meindl | Extreme durability, cold | Air Revolution Alpine Pro 200 | Crampon-ready, very warm, long-lasting |
| Salomon | Urban, breathable | X Ultra Snowpilot | Stylish, no break-in, good for light trails |
| Mammut | Lightweight versatility | Blackfin III Mid DT | Moves like a 3-season boot, grippy |
| Merrell | Snowshoeing, agility | MTL Thermo Rogue 4 Mid | Responsive, supportive, great traction |
| Columbia | Budget warmth, ice grip | Expeditionist Extreme | Very warm, grippy, affordable |
| Hoka | Long-distance comfort | Kaha 2 Frost GTX | Cushioned, warm, dual-density EVA |
| Lacrosse | Bushwhacking, deep snow | Ursa LS GTX | High collar, durable, surprising agility |
| Baffin | Sub-zero survival | Flare Tundra | Unmatched warmth, built for -40°F |
User Warning: “Columbia and TNF are fashion brands for boots—avoid them.” — Critical review
Reality Check: Columbia Expeditionist tested well for grip and comfort in real-world use.
Don’t Ignore Socks and Accessories
Your boot is only half the system. Socks and add-ons complete the equation.
Choose the Right Socks
- Material: Merino wool blend—wicks moisture, resists odor, warm when wet
- Weight: Midweight or heavyweight full cushion
- Brands: Smartwool, Darn Tough
Pro Tip: “The socks and rotation of dry ones are nearly as important as the boot.” — User insight
Carry a spare pair and change if feet get damp.
Essential Accessories
- Gaiters: Seal out snow and debris
- Microspikes: For icy trails and packed snow
- Boot dryers: Speed drying, especially for non-removable liners
These small items make a big difference in comfort and safety.
Evaluate Price vs. Value
Winter boots range from $100 to $450. Know where to spend.
Budget Tiers
- Under $200: Limited durability. Look for sales on Oboz, Keen, La Sportiva
- $200–$300: Sweet spot—includes Salewa, Hoka, Merrell, Columbia
- $300+: Premium features and durability (Meindl, Lacrosse)
Durability Warning: “Boots under $200 aren’t BIFL unless on sale.” — User review
Invest in quality—you’ll use them for years.
Long-Term Value
- Meindl ($449): Can last 10+ years with care
- Columbia ($150): Great value but shorter lifespan
- Salewa ($250): High performance, moderate price
Consider cost per use, not just upfront price.
Final Recommendations by Scenario
For a Teen on a Guided Mountaineering Trip
- Boot: Oboz Bridger 8″ Insulated or La Sportiva Ultra Raptor
- Why: Durable, supportive, waterproof, under $200
- Avoid: Over-insulated models—focus on breathability and grip
For Urban and Light Trail Hiking
- Boot: Salomon X Ultra Snowpilot Waterproof
- Why: Stylish, breathable, no break-in, good traction
- Caution: Low cuff—pair with gaiters in deep snow
For Deep Snow, Hunting, or Bushwhacking
- Boot: Meindl Air Revolution Alpine Pro 200 or Lacrosse Ursa LS GTX
- Why: High collar, durable, crampon-compatible, warm
- Bonus: Excellent ankle support in rough terrain
For Long-Distance Winter Hikes
- Boot: Hoka Kaha 2 Frost GTX
- Why: Dual-density EVA, extended heel brake, 400g insulation
- Benefit: Maximum cushioning reduces fatigue on big days
Final Note: Your winter hiking boots are your foundation. Match them to your activity, prioritize fit and waterproofing, and never compromise on quality. With the right pair, you’ll step confidently into the quiet beauty of winter trails—warm, dry, and ready for anything.