How to Lace a Bean Boot
If your Bean boots pinch the top of your foot, feel loose on the trail, or just take too long to tie every morning, the lacing method is likely the culprit. Bean boots (also called duck boots) are famous for rugged construction and timeless style, but most people never move past the basic crisscross. That means missing out on pressure relief, locked-in security, and slip-on convenience built right into your existing laces.
Below, you’ll learn how to lace a Bean boot using five proven techniques: the Eastland Knot, Ladder, Bar, Zipper, and Traditional Crisscross. Each method includes exact measurements, step-by-step instructions, and the situations where it shines.
Use the Eastland Knot for Slip-On Convenience

The Eastland Knot (also called the Corkscrew Knot) turns laced boots into slip-ons without losing fit. Once tied, you tighten or loosen the boot by scrunching the coils up or down. No re-tying required.
Create a 1-Inch Loop for Stability
Start by forming a small loop at the end of one lace, with the base sitting right at the top eyelet where the lace exits.
- Critical measurement: Make the loop exactly 1 inch (2.5 cm) long.
- Too short prevents the knot from forming. Too long looks bulky and may slip.
- Pinch the base between your thumb and index finger to hold it steady.
Wrap Tightly and Align Coils
Take the free end (aglet) of the lace and wrap it around the base of the loop.
- Begin wrapping from the bottom up.
- Each wrap must press snugly against the previous one, with no gaps.
- Stop wrapping when about 0.25 inches (0.64 cm) of loop remains above the coils.
- A small piece of the original loop should peek out above the wrapped section.
Lock the Coil and Finish
To secure the knot:
- Push the lace end down through the center of the loop.
- Thread it over and under one side so it catches inside the coil.
- Pull tight to lock the structure.
- Repeat the entire process on the opposite lace.
Now slide your foot in by pulling the coils upward to expand the opening. Once your foot is seated, scrunch the coils downward to tighten.
Pro Tip: This method is ideal for quick entry and exit, perfect for porch-to-path transitions or office commutes.
Lock Down Fit with Ladder Lacing
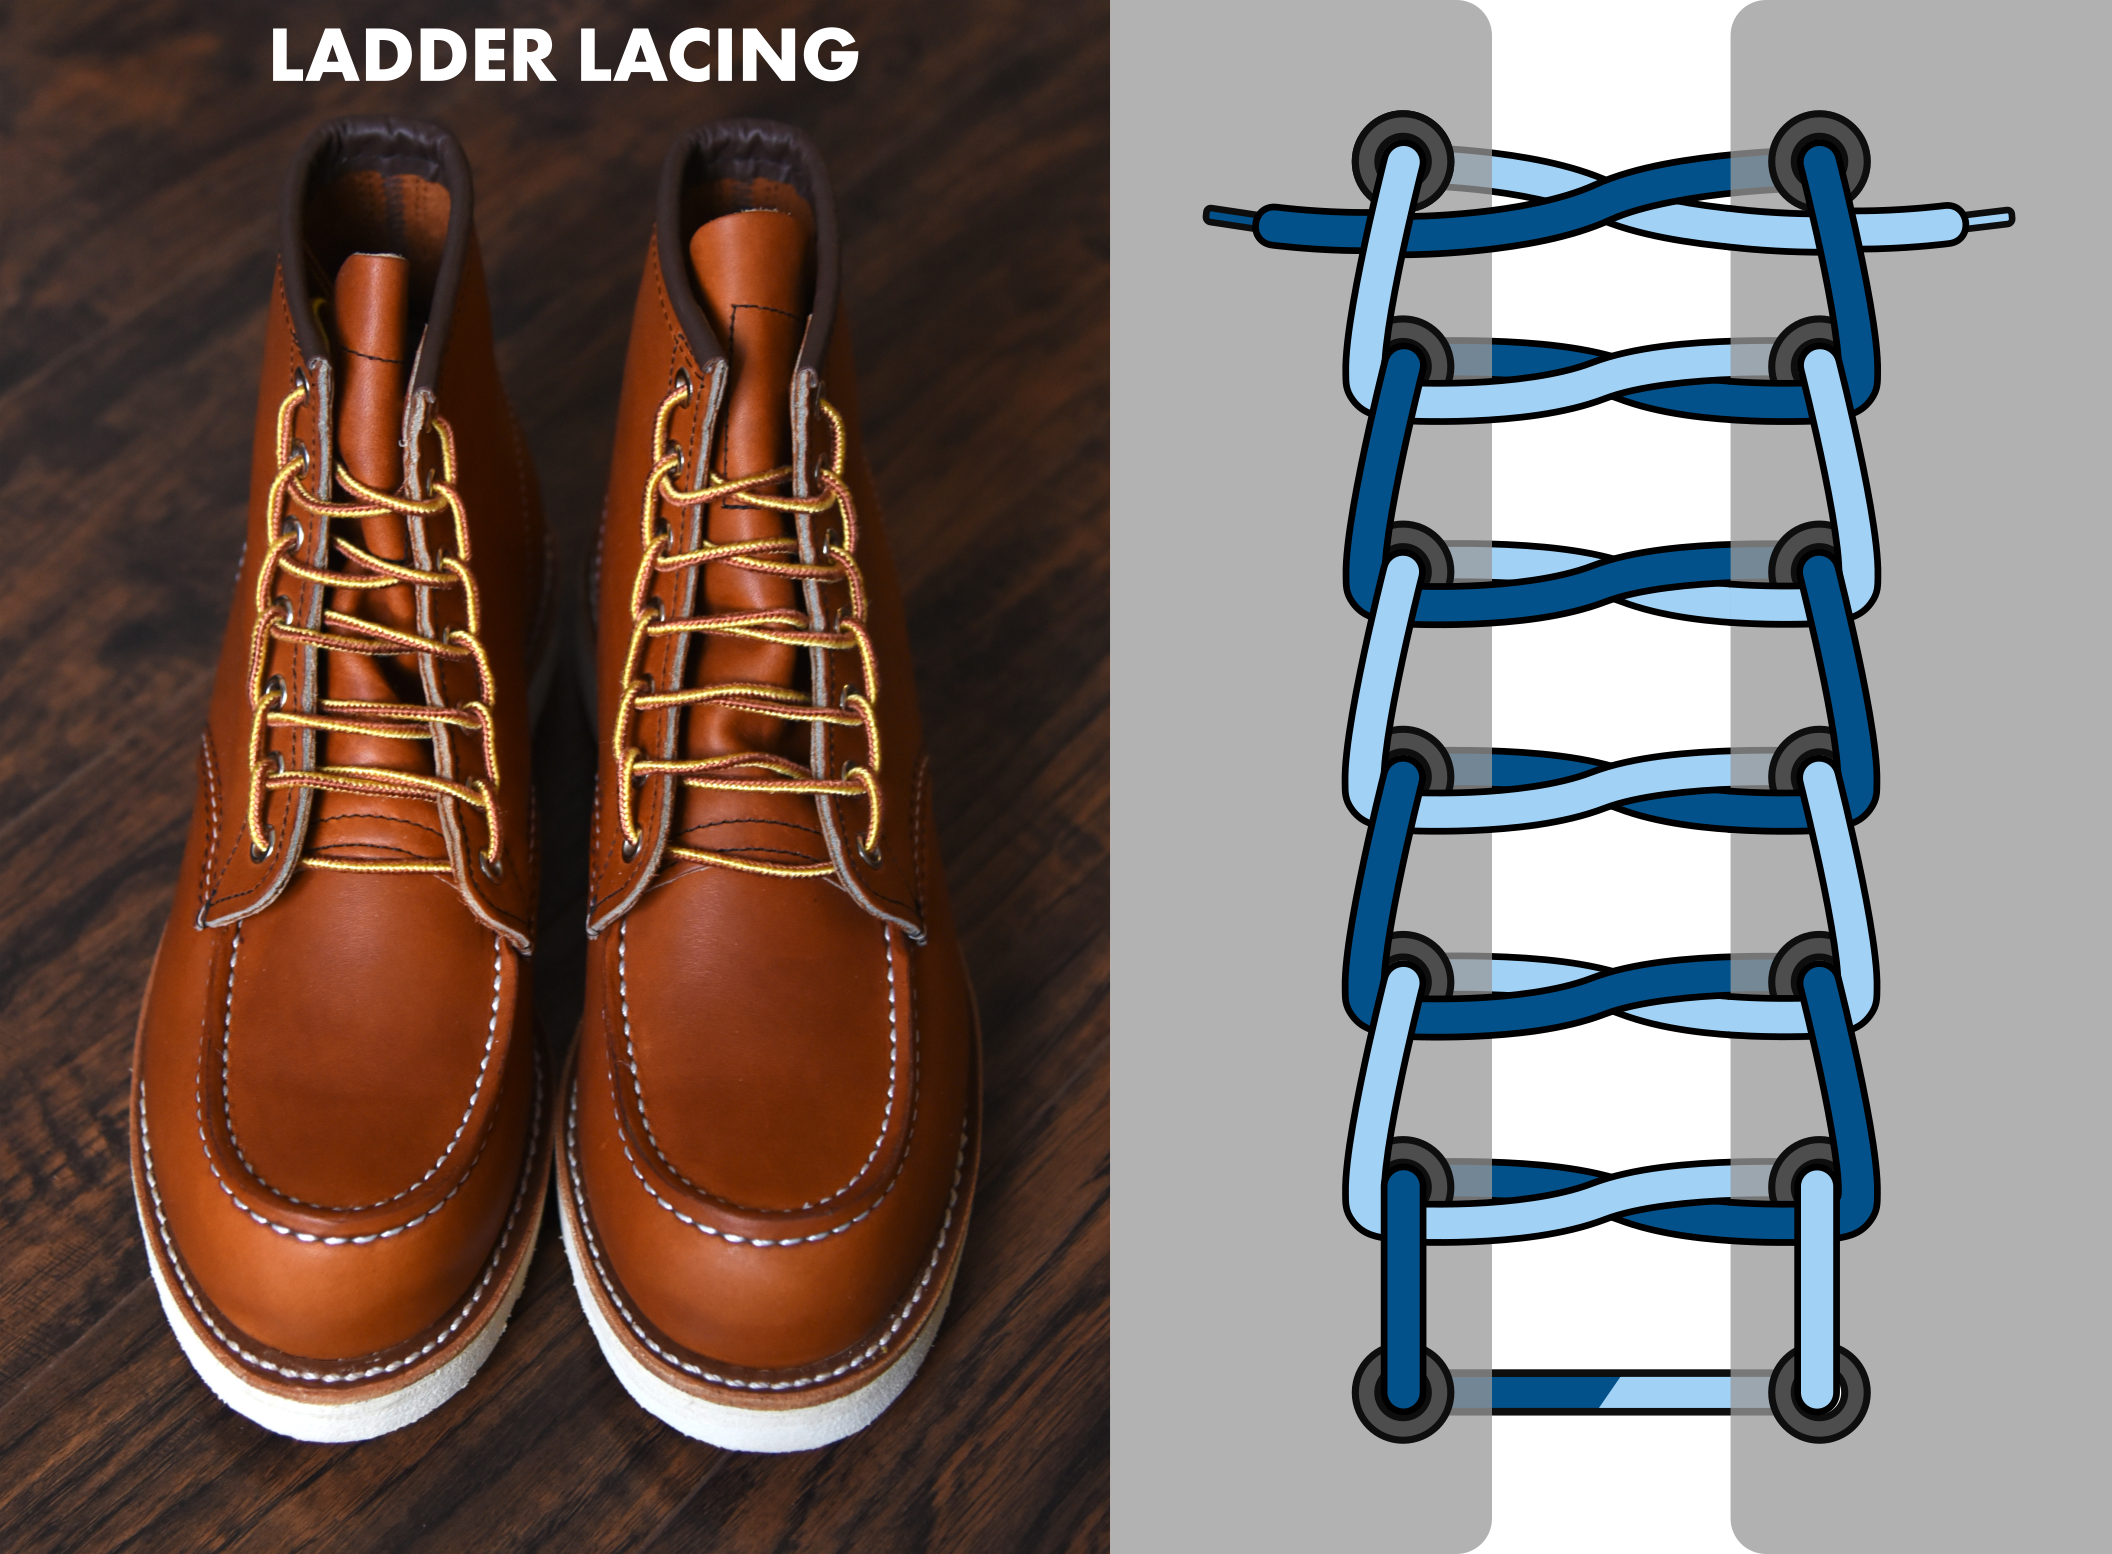
Ladder lacing gives your boots a rugged, utility-inspired look while securing your foot firmly in place. It is ideal for hiking, hunting, or working in slippery conditions.
Start with Equal Ends at the Bottom
Thread the lace through the bottom eyelets from the inside out, so both ends are even.
Build Vertical Sides First
Instead of crossing diagonally:
- Take the left lace and run it straight up the left side to the next eyelet.
- Thread it through from outside in (or inside out, depending on preference).
- Repeat on the right side: bring the right lace straight up to its next eyelet.
This creates vertical “rails” on each side of the boot.
Cross Like a Rung
Now cross the laces horizontally:
- Take the left lace and pass it over to the right side.
- Feed it through the vertical loop you just created on the right.
- Do the same with the right lace: cross over and thread through the left-side loop.
Repeat Upward
- Bring both laces straight up to the next eyelets on their respective sides.
- Thread them through to form new vertical segments.
- Cross again, feeding each lace through the opposite loop.
Keep repeating vertical rise, horizontal cross-through until you reach the top.
Visual Cue: The result should resemble a ladder climbing the front of your boot. Tighten evenly to avoid twisting.
Relieve Pressure with Bar Lacing
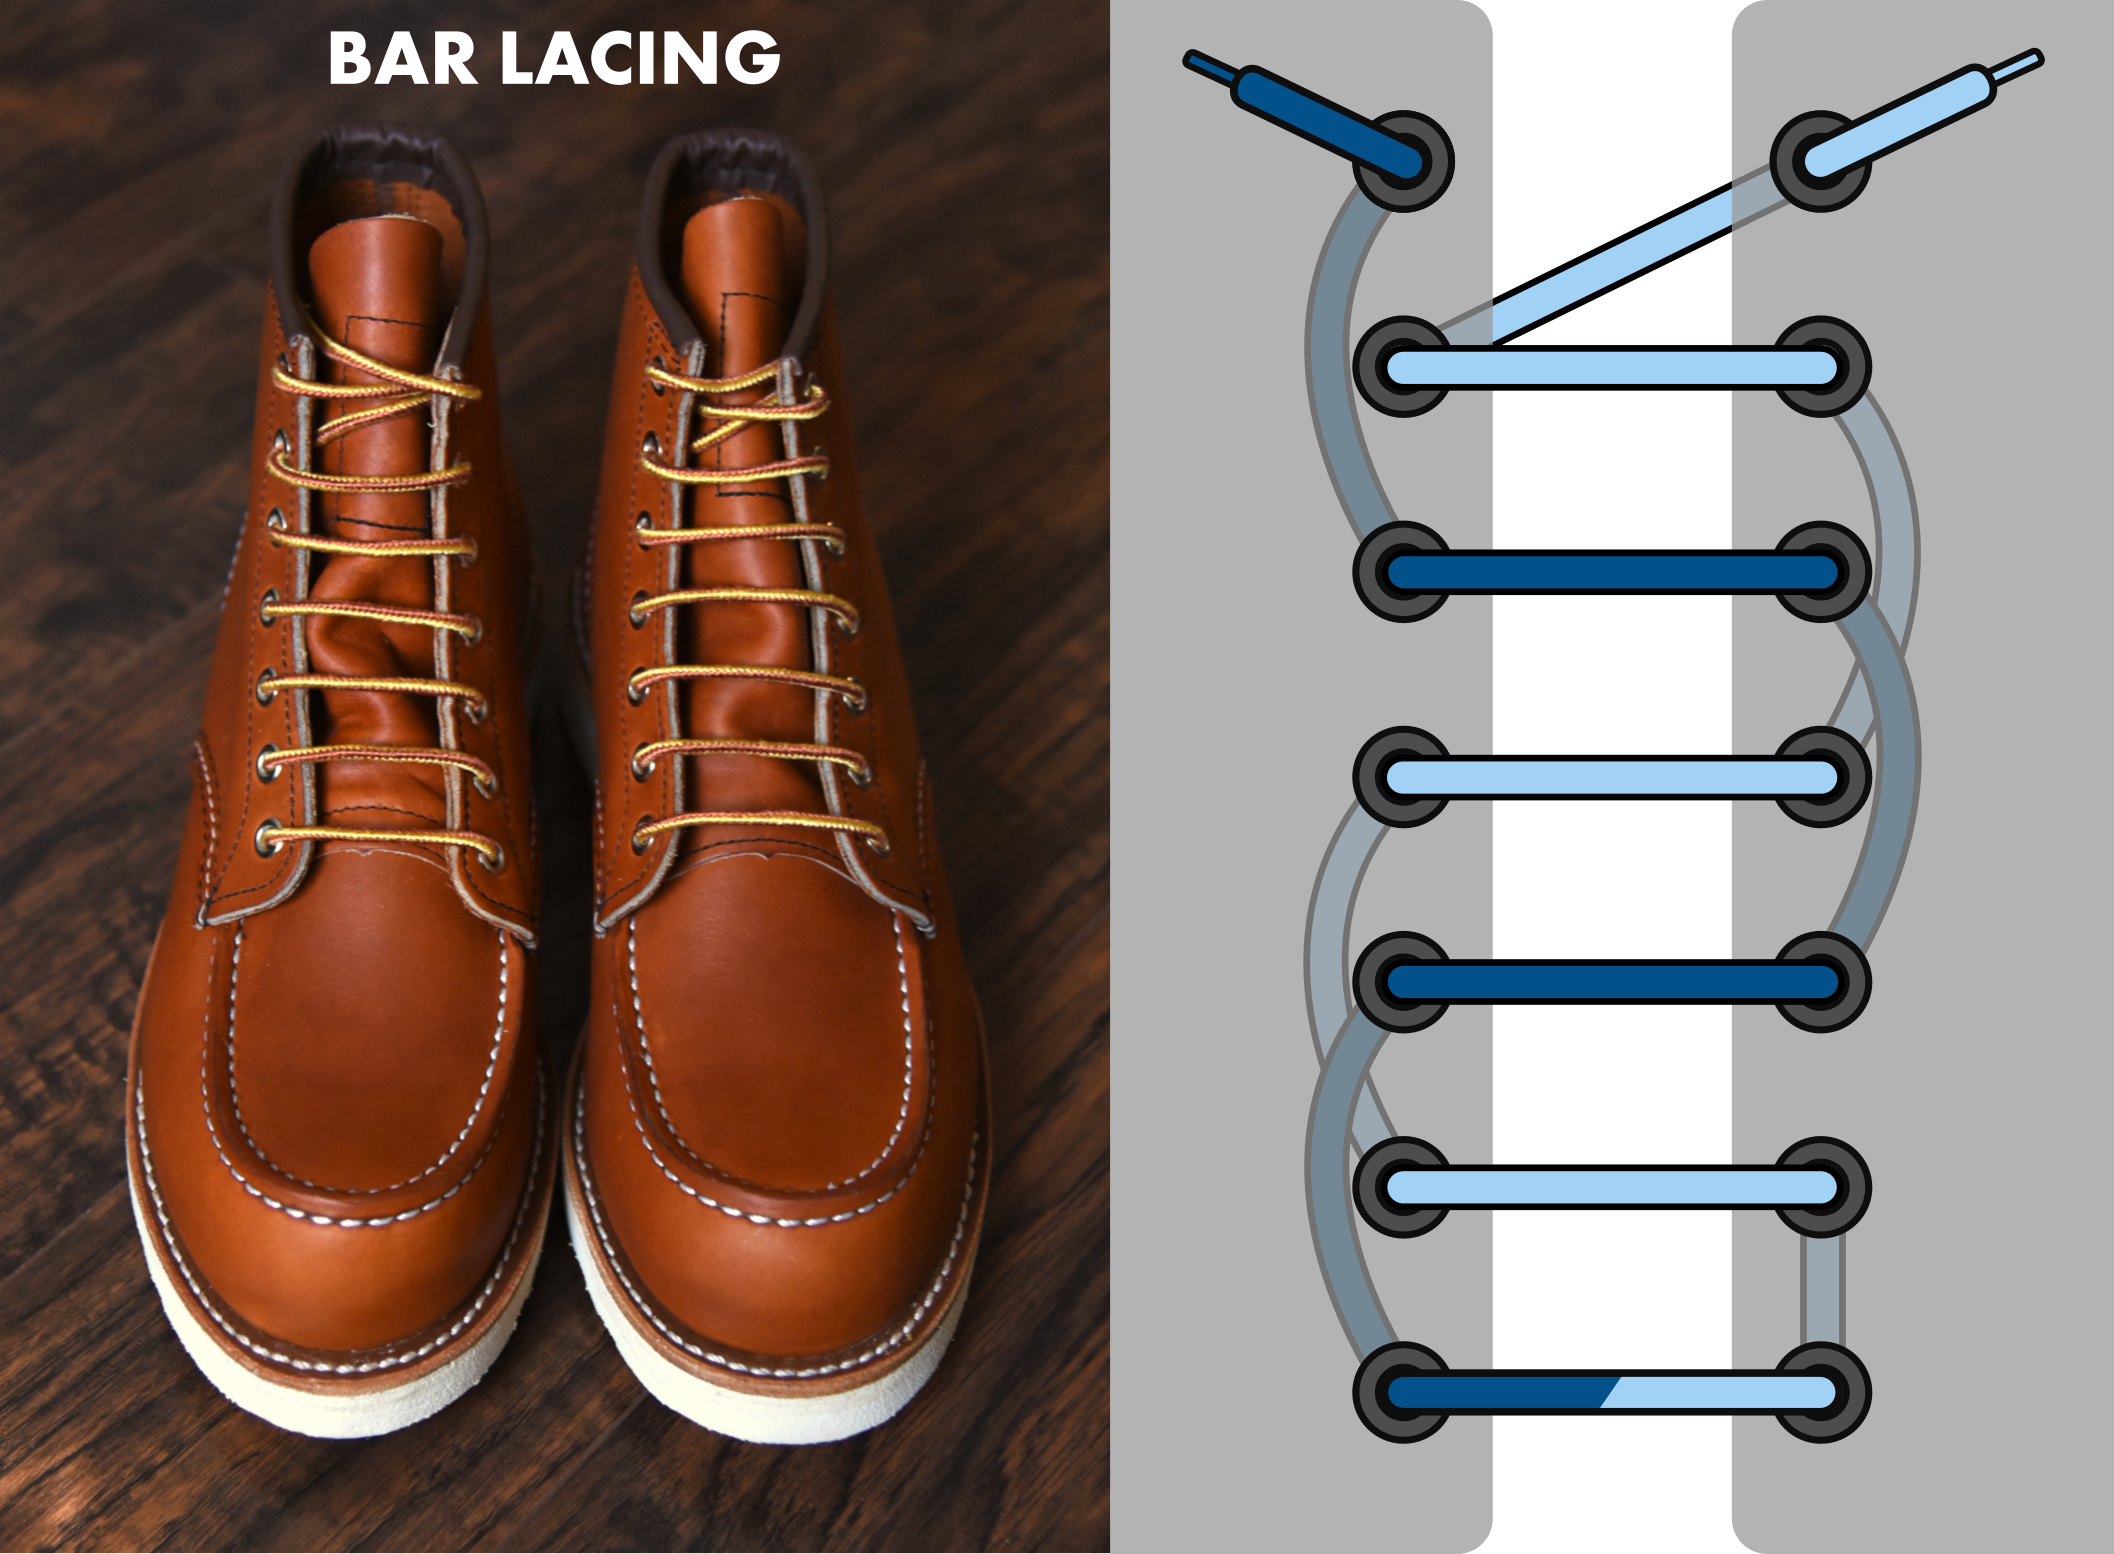
If your boots feel too tight across the instep, Bar Lacing redistributes tension and creates a flat, horizontal pattern that eases pressure while adding a clean, modern aesthetic.
Begin Outside-In at the Bottom
Unlike traditional lacing, thread both ends through the bottom eyelets from outside in. This ensures all visible laces lie flat and horizontal.
Skip an Eyelet After First Cross
- Take the left lace and run it straight up to the eyelet directly above on the same side (outside in).
- Then bring it across horizontally to the right side.
- Thread it through the corresponding eyelet, but skip one row up.
- On the right, thread it into the eyelet two rows above the bottom.
Balance the Pattern
- Now take the right lace and bring it straight across to the left.
- Insert it into the skipped eyelet on the left side (one row up from bottom).
- From there, skip one eyelet up and thread into the next one on the left.
- Cross horizontally again to the right, filling the skipped hole.
Continue this “skip one, thread one, cross over” pattern to the top.
Why It Works: Skipping eyelets reduces diagonal pull, which often causes top-of-foot pressure. The flat bars stabilize without squeezing.
Add Style with Zipper Lacing

Zipper lacing blends security with flair. It creates a braided, zipper-like appearance that locks the laces in place while looking sharp.
Lace from Inside Out at the Base
Start with the bottom eyelets: thread the laces from inside out.
Cross Under the First Bar
- Cross the laces diagonally under the bottom horizontal segment.
- Bring each end up to the next eyelet on the opposite side.
- Thread through from inside out, just like standard crisscross.
Loop Under Before Crossing
Here’s the key step:
- Before rising to the next eyelet, take the current lace (e.g., left side).
- Loop it under the horizontal lace segment on the same side.
- After looping under, bring it diagonally across to the next eyelet on the opposite side.
- Repeat on the other side: loop under, then cross.
Maintain the Zipper Effect
Each time you rise, always loop under the local horizontal bar before crossing. This creates an interlocking pattern that resists loosening and mimics a zipper’s teeth.
Expert Note: This method works best with flat laces, since they stay flatter and create a neater interlock.
Stick to Crisscross for Everyday Use

When in doubt, go classic. Traditional crisscross lacing offers full adjustability and a timeless look suitable for daily wear.
Insert Laces from the Inside
- Feed both ends through the bottom eyelets from inside to outside.
- Pull so both sides are even.
Cross Diagonally Upward
- Take the left lace and thread it up through the next right-side eyelet.
- Pull tight.
- Take the right lace and thread it up through the next left-side eyelet.
- Continue alternating sides.
Always thread from inside out so the crossing happens beneath the eyelets.
Adjust Fit by Lacing Height
- Loose fit: Stop at the second-to-last eyelet.
- Snug fit: Lace all the way to the top.
Finish with a Bow or Eastland Knot
- Tie a standard bow for full adjustability.
- Or, convert to Eastland Knots for a no-tie slip-on system.
Common Mistake: Uneven lacing lengths lead to crooked pulls. Always check symmetry before tightening.
Choose the Right Lacing Method for Your Needs
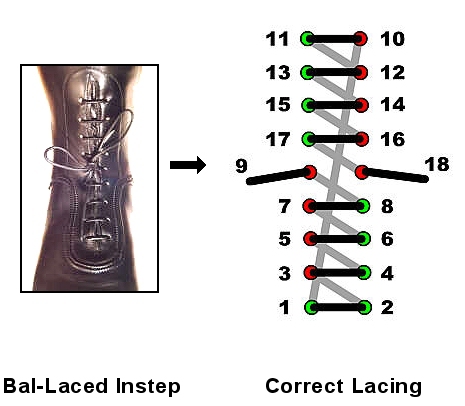
Not every technique fits every situation. Use this quick guide to pick the best method.
| Boot Use Case | Best Lacing Method |
|---|---|
| Quick on/off at home or work | Eastland Knot |
| Hiking, snow, or muddy terrain | Ladder Lacing |
| High instep or wide foot | Bar Lacing |
| Fashion-forward look | Zipper or Bar Lacing |
| General daily wear | Traditional Crisscross |
Fix Common Lacing Problems
Knot Keeps Slipping (Eastland)
- Cause: Loose wraps or incorrect loop size.
- Fix: Re-wrap with tighter coils. Confirm the loop is exactly 1 inch. Scrunch the coil firmly after threading the aglet.
Top of Foot Feels Squeezed
- Cause: Standard crisscross pulls diagonally across pressure points.
- Fix: Switch to Bar Lacing, which reduces direct pressure and allows more room.
Laces Drag on the Ground
- Cause: Long ends or loose bows.
- Fix: Use Eastland Knots to secure excess lace. Or, lace only to the penultimate eyelet to shorten the span.
Can’t Slide Foot In Easily
- Cause: Coils too tight or laces over-tightened.
- Fix: For Eastland knots, pull the wrap upward to expand the loop before inserting your foot. Tighten only after the foot is in.
Maintain Your Laces for Longevity
Even the best lacing fails if the laces wear out.
Inspect Coils Regularly
- Repeated scrunching in Eastland knots can fray fibers.
- Check the coiled section monthly for thinning or fuzziness.
Clean or Replace as Needed
- Remove laces when washing boots.
- Hand-wash with mild soap and air dry.
- Replace if frayed or stretched.
Match Replacement Laces
- Use laces of similar thickness to maintain knot integrity.
- Thicker laces may need slightly larger loops; thinner ones may slip if the 1-inch rule isn’t adjusted.
Note: Original Bean boots often come with flat, waxed laces. Replicate this for best results.
Frequently Asked Questions About Lacing Bean Boots
What is the easiest way to lace Bean boots for everyday wear?
Traditional crisscross lacing is the simplest method. It offers full adjustability, takes only minutes, and works for most daily situations. Finish with a standard bow or convert the top into Eastland Knots for slip-on convenience.
How do I stop my Bean boots from hurting the top of my foot?
Switch to Bar Lacing. By skipping eyelets and running laces horizontally, this method reduces diagonal tension across the instep. Most users with high arches or wide feet notice immediate relief.
Can I make my Bean boots into slip-ons?
Yes. Tie Eastland Knots at the top eyelets instead of bows. Loosen the coils to slide your foot in, then scrunch them down to tighten. You get slip-on speed without sacrificing a secure fit.
Which lacing method is best for hiking in Bean boots?
Ladder Lacing locks your foot in place and prevents shifting on uneven terrain. For added convenience, finish the top with Eastland Knots so you can loosen quickly at camp without untying.
How long should the Eastland Knot loop be?
Exactly 1 inch (2.5 cm). Loops longer or shorter than this may fail to secure properly or look disproportionate. Use a ruler the first few times until the size feels natural.
Do I need special laces for Zipper or Bar Lacing?
No special laces are required, but flat laces work best for Zipper Lacing because they lie flatter and create a cleaner interlock. Round laces still function but may look bulkier.
Key Takeaways for Lacing Your Bean Boots
Knowing how to lace a Bean boot unlocks comfort, security, and style you may not have realized your boots could offer. Start with the Eastland Knot if you want quick on-and-off convenience, switch to Bar Lacing if the top of your foot feels pinched, and try Ladder Lacing before your next hike for a locked-in feel.
Pick one method, practice it on a single boot first, and compare the fit before committing. Once you find your favorite, your Bean boots will feel custom-made for your foot and your routine.