How to Attach Crampons to Hiking Boots: Quick Guide
Slipping on an icy trail isn’t just frustrating—it can be dangerous. One of the most critical skills for winter hikers and alpine climbers is knowing how to attach crampons to hiking boots correctly. A poorly secured crampon can shift, snag, or even detach mid-step, turning a routine ascent into a life-threatening situation. Whether you’re crossing a snowfield, ascending a glacier, or navigating a frozen ridge, secure crampons mean control, stability, and confidence underfoot.
The process might look simple—strap metal spikes to your boots and go—but doing it wrong risks injury, wasted energy, and compromised traction. The key lies in matching your crampons to your boot type, adjusting them precisely, and securing every strap with intention. This guide breaks down exactly how to attach crampons step by step, covering all major types: strap-on (C1), hybrid (C2), and step-in (C3) models. You’ll learn how to fit them securely, avoid common mistakes, and double-check your setup so you can move safely across snow and ice.
Identify Your Crampon Type
Before you start strapping, you need to know what kind of crampons you’re working with—each type attaches differently and requires specific boot features.
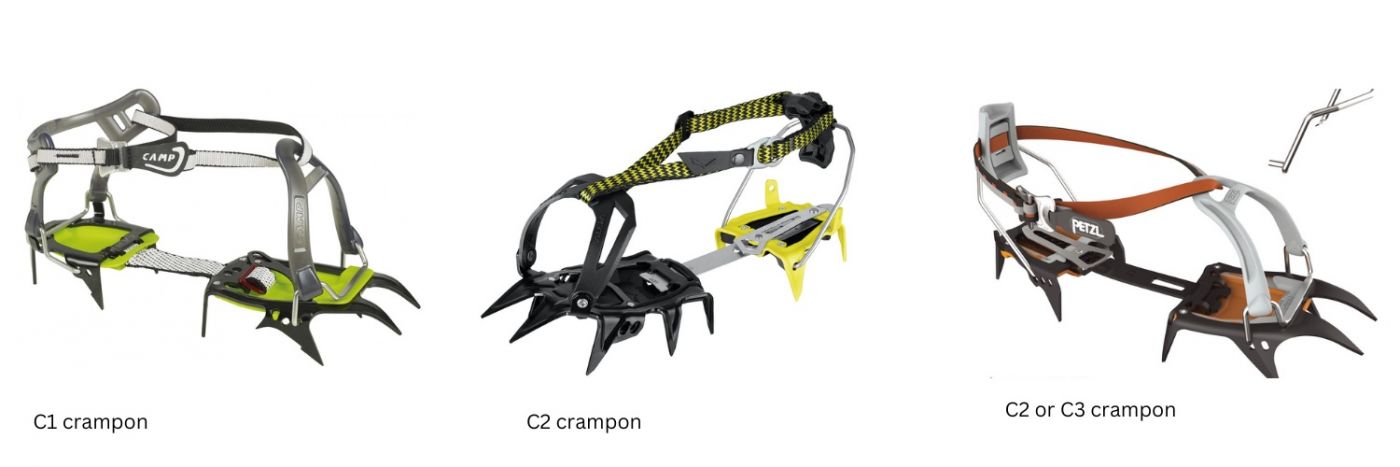
Strap-On Crampons (C1)
Designed for flexible hiking boots (B1 category), strap-on crampons use durable rubber or webbing straps at both the toe and heel. They don’t require front or rear welts, making them ideal for standard backpacking boots without rigid soles. Models like the Black Diamond Contact Strap or CAMP 10 Flex feature a flexible center bar that conforms to non-welted soles, ensuring a snug fit.
Best for: Winter hiking, snowshoeing, and moderate snow travel where technical climbing isn’t required.
Step-In Crampons (C3)
Built for fully rigid mountaineering boots (B3), these crampons have a wire toe bail that hooks over a front welt and a heel lever that snaps securely onto a rear welt. The connection is solid and eliminates flex—perfect for vertical ice climbing. Examples include the Black Diamond Sabertooth Pro.
Requires: Boots with both front and heel welts. Never attempt to use these on flexible hiking boots.
Hybrid Crampons (C2 / New-Matic)
These combine a step-in heel with a strap-on toe, making them ideal for semi-rigid (B2) boots like the La Sportiva Trango, which have a heel welt but no front welt. The Grivel G-12 New-matic is a classic example of this system.
Ideal for: Alpine routes where you need step-in security but don’t want the weight or rigidity of full C3 systems.
Match Crampons to Boot Type
Your boot’s stiffness and sole design determine which crampons will work—and which could fail mid-ascent.
Boot Categories Explained
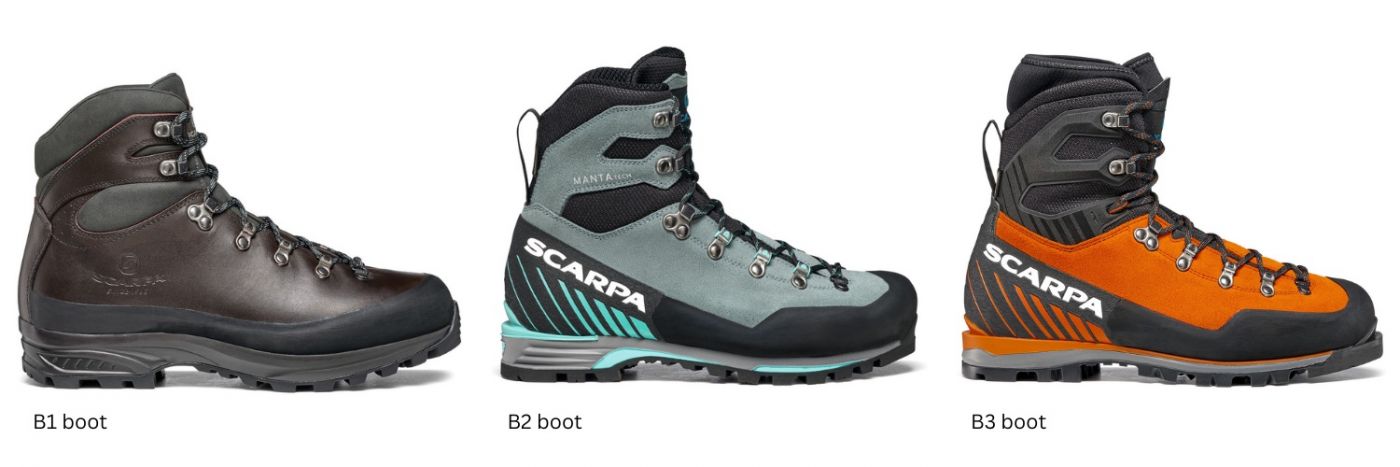
- B0: Flexible hiking shoes – not safe for any crampons.
- B1: Flexible hiking boots – compatible only with strap-on (C1) crampons.
- B2: Semi-rigid mountaineering boots – work with hybrid (C2) or step-in (C3) if welts are present.
- B3: Fully rigid climbing boots – designed for step-in (C3) crampons.
Critical rule: Never use step-in crampons on boots without welts. Without a secure heel shelf, the lever won’t lock, risking sudden detachment.
Check for Welts and Lugs
- Front welt: A raised ridge around the toe. Required for step-in and hybrid crampons.
- Heel welt: A horizontal lip at the back of the boot. Essential for heel clip engagement.
- Lugs: Rubber protrusions on the sole. Crampon bails should sit between them, not on top.
Pro tip: If your boot lacks welts, stick with strap-on crampons. Forcing a step-in system compromises safety.
Prepare Before Attaching
Set yourself up for success before stepping onto snow or ice.
Choose a Stable Surface
Attach crampons on flat, firm ground—not on a slippery slope. Stamp out a platform in soft snow or use rock, ice, or a packed trail. Use your ice axe as a support to stay balanced.
Avoid: Wobbly, uneven, or icy surfaces where a misstep could lead to a fall.
Organize Your Gear
- Store crampons in a labeled, waterproof bag to prevent mix-ups.
- Lay them out with left and right clearly visible.
- Face buckles outward to prevent snagging during wear.
Practice at home: Put them on with gloves in your backyard to simulate real conditions.
Adjust Crampon Size Correctly
A poor fit leads to instability and snow buildup. Adjust both length and height before stepping in.
Set the Right Length (Pin-Lock System)
Most crampons use a pin-lock adjustment:
1. Pull up the center bar pin.
2. Slide the bar forward or backward.
3. Release to lock in place.
Goal: Boot toe sits fully inside the front bail, and heel fits tightly against the rear cup.
Fit Tips by Boot Type
- B1 boots: Use the rear toe bail position for better front-point projection.
- Double boots or large sizes: Try the forward position for alignment.
Warning: Gaps allow snow to build up and weaken grip.
Adjust Heel Height (Hybrid & Step-In)
For models with heel levers, set the heel throw:
– Loosen or tighten using a dial or pin system.
– Aim for a solid “clunk” when engaging—secure but not over-tight.
Middle setting usually works best. Too loose = risk of disengagement; too tight = hard to release.
Attach Crampons Step by Step
Follow this universal sequence, then apply type-specific details.
General Attachment Sequence
- Place crampon on the ground, buckle side out.
- Step into the toe area like a ski binding.
- Slide heel forward into the heel cup.
- Engage heel mechanism (if applicable).
- Secure all straps.
Keep movements deliberate—rushing leads to misalignment.
How to Secure Strap-On Crampons
Used with B1 boots (e.g., hiking boots without welts):
Step 1: Position the Toe
- Push boot toe into the front cradle.
- Ensure it sits between the two front lugs.
Step 2: Lock the Heel
- Rock the plastic heel cup backward so it presses against the boot heel.
Step 3: Route and Tighten the Strap
- Thread strap through the front cradle.
- Pass through the heel cradle hole.
- Bring across the front of the boot.
- Feed through both D-rings (buckles).
- Pull back through the gap between rings.
- Pull firmly to remove all slack.
Final check: No movement when you twist the crampon by hand.
How to Use Hybrid Crampons (New-Matic)
For B2 boots with heel welts but no front welts:
Step 1: Engage Toe Bail
- Push the toe bail over the front of the boot (not a welt—it’s strap-based here).
Step 2: Snap Heel Lever
- Lift the heel lever.
- Slide it over the heel welt.
- Listen for a distinct “clunk”—confirms secure lock.
Step 3: Secure Ankle Strap
- Route and tighten as with strap-on models.
- Use for added security, especially on steep terrain.
Troubleshooting: If heel won’t snap, loosen the heel dial slightly to create clearance.
How to Use Full Step-In Crampons
For B3 rigid boots with front and rear welts:
Step 1: Hook Front Bail
- Slide the wire toe bail over the front welt.
Step 2: Lock Heel Clamp
- Lift the heel lever.
- Snap it over the heel welt—should require firm pressure.
Step 3: Tighten Front Strap
- A strap goes around the front of the boot, not through a cradle.
- Secures any remaining play.
Expert trick: Slightly undersize the crampon—when the heel locks, it pulls the toe forward, eliminating front-end wiggle.
Tighten Straps Securely
Even a small amount of slack can lead to failure.
Avoid Twists and Kinks
Ensure the strap lies flat and smooth—no twists. A kinked strap weakens over time and can slip.
Use the Locking Mechanism
Most crampons use a double D-ring buckle:
1. Open both rings like a book.
2. Thread strap through both.
3. Use the locking tag to prevent slippage.
4. Pull tight—then re-tighten to eliminate residual slack.
Test: Try to twist the crampon by hand. If it moves, go back and tighten.
Manage Excess Strap Length
Loose straps are dangerous—they can catch on crampon points or trip you.
Tuck Into Gaiters
Slide the end into the side of your gaiter or pant leg. Keeps it secure and out of the way.
Tie a Knot
Make a simple knot on the outside of the heel cup. Avoid large knots that could interfere with movement.
Trim Only If Permanent
If using the crampons only with one pair of boots, trim excess strap and tuck the end under another strap.
Never leave dangling ends—they pose entanglement and tripping risks.
Install Anti-Balling Plates

Snow buildup under your crampons can lift them off your boots—making traction useless.
Why They Matter
- Prevent snow from packing between crampon and sole.
- Maintain direct metal-to-ice contact.
- Reduce weight and improve stride efficiency.
Critical: Use them anytime snow is soft, wet, or deep.
How to Attach
- Most crampons come with rubber or plastic anti-balling plates.
- Clip or snap them under the foot frame.
- Replace if cracked or missing.
Warning: Skipping anti-balling plates in snowy conditions is a serious safety hazard.
Perform Final Safety Checks
Never skip this step—take 30 seconds to verify everything is secure.
Visual Inspection
- Buckles on the outside? Yes → prevents snagging.
- Crampon aligned with boot sole? Yes → follows natural curve.
- No gaps at toe, heel, or sides? Yes → ensures full contact.
- Spikes fully exposed? Yes → no fabric or strap blocking points.
Physical Tests
- Rock Test: Gently tilt foot side to side—no movement.
- Stamp Test: Stomp hard—crampon stays attached.
- Twist Test: Try to rotate crampon by hand—should resist.
Pro tip: Re-check after the first 10 steps—straps often loosen slightly during initial movement.
Optimize Front Point Projection
Your front spikes must engage ice effectively—without kicking your boot.
Ideal Projection: 3/4″ to 1″
- Too short: Points don’t bite into ice.
- Too long: Risk of kicking the boot toe, reducing balance.
Adjust via length setting—use rear position for B1 boots to limit overhang.
Maintain and Practice
Good habits start before you hit the trail.
Practice at Home
- Put on crampons with gloves in cold conditions.
- Time yourself—aim for under 2 minutes per foot.
- Simulate wind, snow, and low light.
Inspect Regularly
- Check straps for fraying, buckles for cracks, metal for bends.
- Replace worn parts immediately.
Steel vs Aluminum: Steel lasts longer on rock; aluminum is lighter but less durable.
Final Note: Attaching crampons correctly isn’t just about comfort—it’s about survival. A few minutes of careful fitting can prevent a fall on a glacier or a slip on an icy ridge. Always match your crampons to your boot type, adjust for a snug fit, secure all straps, and double-check before moving. With practice, you’ll be able to gear up quickly and confidently, no matter the conditions. Stay safe, stay secure, and keep climbing.