How to Put on Boot Spurs: Quick Steps
Putting on boot spurs correctly is essential for both rider control and horse welfare. Whether you’re preparing for a Western trail ride or an English dressage session, improperly attached spurs can lead to discomfort, equipment failure, or unintended cues to your horse. The process varies slightly depending on the spur type, but the core principles remain the same: secure fit, correct orientation, and safety. In this guide, you’ll learn exactly how to put on boot spurs step by step, avoid common mistakes, and ensure your spurs function as precision tools, not hazards.
Identify Your Spurs and Straps

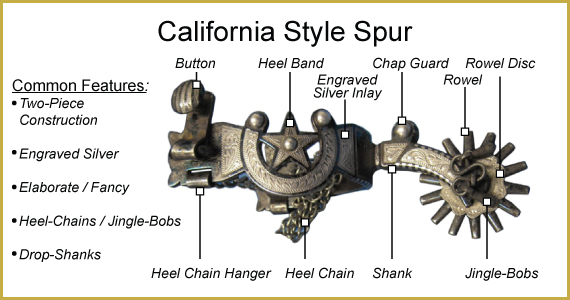
Know the Spur Components
Before attaching spurs, recognize their key parts:
– Heel band wraps around the back of the boot heel.
– Shank extends downward and must angle toward the ground.
– Rowel rotates and delivers subtle pressure and must face forward when riding.
– Branches are the two arms of the heel band, with one usually longer than the other.
– Attachment points include buttons for Western styles or slots and bars for English styles.
Understanding these parts ensures proper placement and function when you put on boot spurs.
Match Spurs to Correct Straps
Spur straps differ by riding style:
– Western straps are wider and often feature button-hole fasteners.
– English straps are narrow and thread through spur slots.
Never mix types, as using the wrong strap risks slippage or misalignment. Always check that buckles face outward and decorative sides show when worn.
Prepare Spurs for Attachment
Check Left vs Right Orientation
Many spurs are asymmetrical, so correct orientation matters. To position them properly:
– Place the longer branch on the outside of the boot.
– Angle the shank down and slightly back.
– Ensure the rowel points forward when seated.
Wearing spurs backward can cause them to snag or deliver harsh cues to your horse.
Inspect Equipment for Safety
Before every use, examine your gear:
– Check straps for cracks, stretched holes, or frayed stitching.
– Test rowel rotation and clean out any debris if stuck.
– Confirm boot compatibility by ensuring your boots have a spur ledge or rest.
Replace damaged parts immediately. A broken strap mid-ride compromises safety for both you and your horse.
Attach Western-Style Spurs (Button Type)

Position Spurs on Heel
Place the heel band over the boot’s spur ledge. It should sit snugly but not tightly. The shank must point down, and the longer branch faces outward. Avoid forcing it; adjust gently if too tight or loose by slightly bending the metal heel band.
Secure with Button Straps
Use two short straps with buttonholes:
1. Hook one end of each strap onto the buttons on either side of the heel band.
2. Cross the free ends over the instep.
3. Buckle them together on the outside of the ankle.
Ensure the buckle lies flat and doesn’t rub against your other leg or the horse.
Adjust for Snug Fit
Tighten or loosen using the strap holes. The spur should:
– Stay in place without sliding.
– Allow slight vertical movement.
– Let you fit a finger under the strap with mild resistance.
Over-tightening causes numbness, while under-tightening leads to slippage during rides.
Install English-Style Spurs (Slot/Bar Type)

Thread the Long Strap
Use a single long strap for this method:
1. Insert the strap through the top hole of the outside branch.
2. Pull it down through the bottom hole of the same side.
3. Run the strap under the heel of the boot.
4. Bring it up through the bottom hole of the inside branch, then out the top.
Keep the decorative side facing outward throughout the threading process.
Slide On and Buckle
Once threaded:
– Slide the spur onto the heel ledge.
– Pull both strap ends across the instep.
– Join and buckle on the outside of the ankle.
Tuck excess strap into keepers or secure flat against the boot to prevent snagging on tack.
Verify Shank and Rowel Alignment
After buckling:
– The shank should slope downward.
– The rowel points forward when riding position is simulated.
– No part should catch on stirrup leathers or saddle.
Misaligned spurs reduce effectiveness and increase risk during riding.
Alternative: Pre-Attach Before Putting On Boots
Assemble Spurs First
If threading is difficult with boots already on:
– Remove your boots.
– Fully assemble and buckle spurs while the boot is off.
This gives better access and visibility, especially for tight boots or fiddly straps.
Put On Boots with Spurs Attached
Carefully slide the booted foot in, ensuring:
– Spurs don’t catch on fabric.
– The heel band stays seated on the ledge.
– Straps remain snug after flexing the ankle.
Test movement before mounting your horse.
Confirm Proper Fit and Function
Perform the Stability Test
After attachment:
– Walk several steps.
– Flex your ankle up and down.
The spur must stay fixed just above the heel. Any wobble or drop means it’s too loose.
Check Symmetry and Height
Compare both spurs:
– They should sit at the same height on each boot.
– Buckles should align on the outside.
– Rowels should face identical directions.
Asymmetry affects balance and cue delivery to your horse.
Simulate Riding Pressure
Sit as if in the saddle:
– Lower your heel gently.
– Ensure the rowel only touches when pressure is applied.
If it drags at rest, reposition or tighten the strap before riding.
Fix Common Spur Problems
Spurs Sliding Down the Boot
Cause: Smooth leather, no spur ledge, or loose strap.
Fix: Tighten the strap one notch. Add rubber spur guards to increase grip and protect boot material.
Buckle Rubbing Ankle or Horse
Cause: Installed on the inside.
Fix: Re-buckle so closure is on the outside of the boot. This prevents chafing and equipment entanglement.
Rowel Catching on Saddle
Cause: Shank angled wrong or rowel facing backward.
Fix: Reposition so shank points down and back, and rowel faces forward. Never ride with backward-facing rowels.
Discomfort or Numbness
Cause: Strap too tight or heel band too small.
Fix: Loosen one hole. If pain persists, check spur size, as some boots need wider heel bands.
Excessive Wobble
Cause: Loose strap or oversized heel band.
Fix: Tighten the strap. Gently squeeze the heel band inward if the metal allows to reduce diameter.
Maintain Spurs for Longevity
Inspect Before Every Ride
Always check:
– Straps for wear, cracks, or stretched holes.
– Rowel rotation to confirm free spinning.
– Buckles for rust or breakage.
Replace worn components immediately, as this is non-negotiable for safety.
Clean After Use
Wipe off:
– Dirt, sweat, and mud from metal and straps.
– Corrosion from rowels or shanks.
Use leather conditioner on straps periodically to prevent drying and cracking.
Store Properly
Keep spurs:
– In a dry place.
– Away from moisture and extreme temperatures.
– Preferably in a spur bag or case to avoid scratches.
Follow Best Practices for Safe Use
Use Spurs Responsibly
Spurs are refinement tools, not punishment devices. Apply light, brief cues only when needed. Overuse desensitizes the horse and damages trust over time.
Choose Appropriate Rowel Types
For beginners or sensitive horses:
– Use rubber-covered or plastic rowels.
– Avoid sharp or aggressive styles.
These reduce the risk of accidental marks or trauma to your horse.
Know When Not to Use Spurs
Avoid spurs if:
– You lack independent seat and leg control.
– The horse has open sores or skin sensitivity.
– You’re riding in crowded or unpredictable environments.
Master leg aids first, since spurs should enhance, not replace, your riding skills.
Frequently Asked Questions About Boot Spurs
Which side of the boot should the buckle be on?
The buckle should always be on the outside of the boot. Placing it on the inside causes rubbing against your other ankle and the horse’s side, leading to discomfort and potential injury.
How tight should spur straps be?
Spur straps should be snug enough to prevent sliding but loose enough that you can fit a finger underneath with slight effort. Over-tightening causes numbness, while loose straps allow dangerous movement.
Can I use Western straps on English spurs?
No, Western and English straps are generally not interchangeable. Western straps are wider and use button-hole designs, while English straps are thinner and thread through slots. Using the wrong strap compromises security.
How do I know if my spurs are on backward?
The longer branch of the heel band should sit on the outside of your boot, the shank should angle down and slightly back, and the rowel should point forward when you’re seated. If any of these are reversed, your spurs are on backward.
Why do my spurs slide down my boot?
Sliding usually happens because the boot lacks a spur ledge, the leather is too smooth, or the strap is too loose. Tighten the strap one hole or add rubber spur guards to increase friction.
Should beginners use spurs?
Beginners should master basic leg aids before adding spurs. When starting out, choose rubber or plastic rowels to minimize injury risk, and only use spurs when you have independent control of your seat and legs.
Key Takeaways for Putting on Boot Spurs Safely
Learning how to put on boot spurs properly ensures effective communication with your horse and prevents injury. Always follow the orientation rules: longer branch out, buckle out, rowel forward. Test the fit by walking and flexing your ankle before mounting, and inspect straps and rowels before every ride.
With regular maintenance and mindful use, spurs become a seamless extension of your riding technique. Start by checking your equipment today, practice the attachment steps until they feel natural, and always prioritize your horse’s comfort alongside your own control.