How Often to Replace Hiking Boots: Guide & Tips
You’ve climbed ridges, crossed rivers, and logged hundreds of trail miles in your trusty hiking boots. But now, something feels off. Your knees ache on descents. Your feet feel every rock. The tread looks suspiciously flat. It’s time to face the question: When should you actually replace hiking boots?
There’s no one-size-fits-all answer. While many hikers follow the 500-mile rule, the real replacement timeline depends on boot type, terrain, body weight, and wear patterns. Most replace boots every 3–5 years or after 500–750 miles, but some retire them at 400 miles, while others stretch them to 1,000 with proper care.
The key isn’t mileage or age—it’s condition. Worn-out boots don’t just reduce comfort; they increase injury risk. This guide breaks down the 9 unmistakable signs it’s time to replace hiking boots, how to extend their life, and when repairs make sense. Whether you’re a weekend hiker or a long-distance backpacker, knowing when to swap out footwear protects your feet, joints, and adventures.
Know Your Boot’s Mileage Range
Trail Shoes vs. Mountaineering Boots
Not all hiking boots wear the same. Lightweight trail runners won’t last as long as stiff, high-cut backpacking boots. Here’s what to expect by type:
- Trail running shoes: 350–500 miles
Lightweight and fast, but mesh uppers and thin midsoles wear quickly. - Hiking shoes (e.g., Merrell Moab): ~500 miles
Balanced protection and flexibility—ideal for day hikes. - Mid-cut boots (e.g., Salomon X Ultra): 500–750+ miles
Extra ankle support and thicker soles for weekend trips. - Mountaineering boots (e.g., La Sportiva Nucleo): 600–1,000+ miles
Reinforced construction for extreme terrain and heavy loads.
Frequent hikers may hit 500 miles in under a year. Weekend users might take 3–4 years—meaning time matters as much as mileage.
How Time Affects Boot Longevity
Even unused boots degrade. EVA midsoles lose cushioning over time, rubber dries out, and adhesives weaken. Extreme temperatures and humidity accelerate this.
Rule of thumb: Replace boots every 3–5 years, even with low use.
Boots older than 5 years should be inspected closely—especially if stored in damp basements or hot garages. If they feel flat or cracked, it’s time to retire them.
Spot Midsole Failure Early
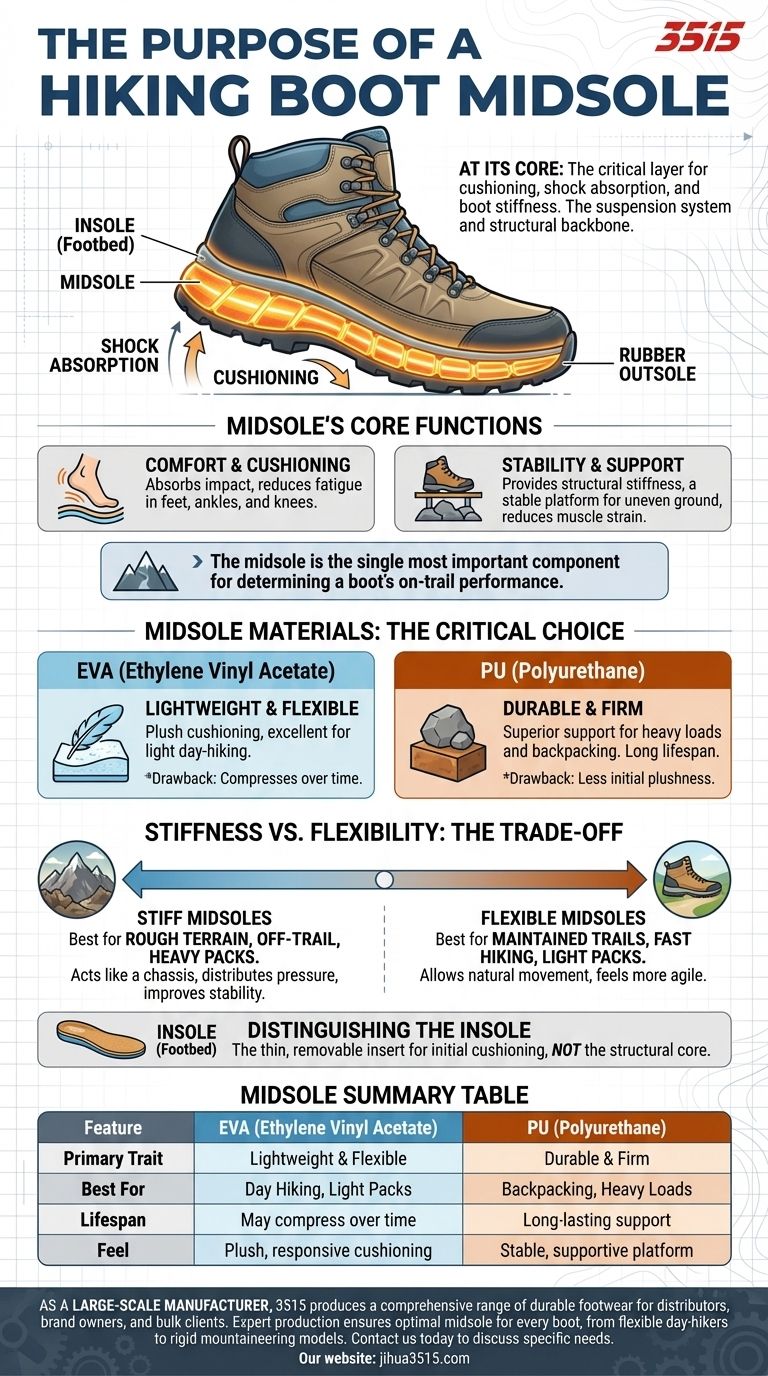
Press Test for Foam Compression
The midsole absorbs impact and supports your joints. Once it fails, every step transfers more shock to your knees and back.
Do the press test:
1. Turn the boot upside down.
2. Press your thumb into the outsole at heel, midfoot, and forefoot.
3. Watch the side of the midsole.
- Healthy foam: Slight wrinkles that rebound quickly.
- Failed foam: Deep, permanent creases or cracks.
If the foam doesn’t spring back, it’s no longer protecting you—replace the boots.
When You Start Feeling the Ground
“Bottoming out” means you feel rocks, roots, or gravel through the sole. This isn’t just uncomfortable—it’s dangerous. Without cushioning, your feet fatigue faster, and joint pain increases.
If new insoles don’t help, the midsole is likely done. Don’t ignore this—your body is warning you.
Check Tread Wear and Traction
Measure Lug Depth
Hiking boot lugs start at 3.5–5.5 mm. Once worn below 1–2 mm, traction plummets—especially on wet rocks or loose scree.
Signs of worn tread:
– Lugs look flat, like a bald tire
– Smooth patches on heel or toe (common braking zones)
– Slipping on trails you used to handle
Test it: Walk on a wet sidewalk. If you slip, it’s not the weather—it’s your boots.
Uneven Wear Reveals Gait Issues
Inspect the tread pattern:
– More wear on inner forefoot? Likely overpronation.
– Outer edge worn down? You may supinate.
Uneven wear speeds up failure and destabilizes your stride. While orthotics can help, worn soles won’t grip properly.
Inspect the Upper for Damage
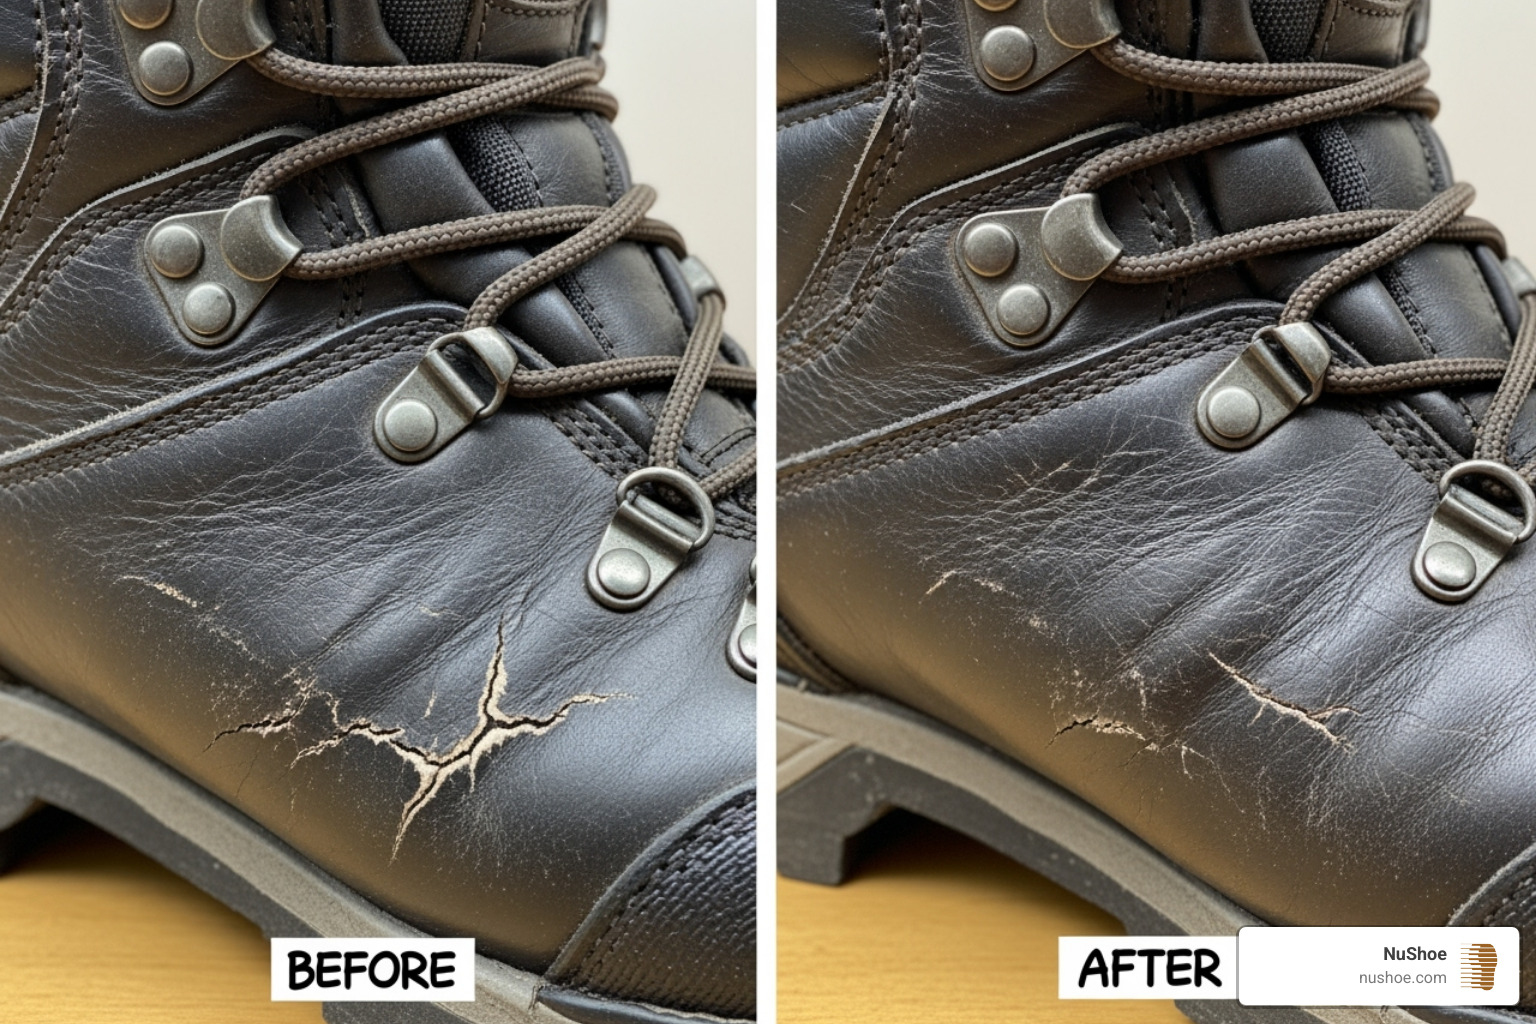
Holes, Tears, and Separation
The upper protects your foot. When it fails, water, dirt, and debris get in—increasing blister risk and discomfort.
Critical signs:
– Holes in mesh or leather
– Splitting at the toe box
– Peeling toe cap
– Frayed stitching along the sole
Even small tears compromise performance. Once water seeps through, drying takes longer, and odor or mold can develop.
Collapsed Ankle Support
In mid- and high-cut boots, the ankle collar stabilizes your joint. Over time, padding compresses.
Signs of failure:
– Boots feel loose, even when laced tightly
– “Buckling” on sidehills
– More ankle rolls or instability
If your boots no longer hold your ankle securely, they’re not doing their job—no matter how good the tread looks.
Diagnose Sole Separation
Look for Delamination Gaps
When the outsole peels from the upper, it’s called delamination. It often starts at the toe or heel.
What to check:
– Run fingers along the sole-upper seam
– Look for visible gaps or flapping
– Feel for “sloshing” or air pockets
Delamination lets in water and sharp objects. It also reduces torsional rigidity—your boot bends too much side-to-side.
Can You Repair It?
Minor separation can be glued with Shoe Goo or Barge Cement. Resoling may be needed if:
– Less than 30% of the sole is separated
– Midsole is intact
– Upper is undamaged
If delamination is widespread, replacement is safer.
Evaluate Insole and Arch Support
Replace Insoles Before the Boots
Most boots have removable insoles that wear faster than the midsole. Swapping them can extend boot life.
Signs it’s time:
– Deep foot-shaped impressions
– Cracks in foam
– Flattened heel cup
– Arch feels “gone”
Aftermarket insoles (e.g., Superfeet, Sorbothane) restore support. But if the midsole underneath is cracked, new insoles won’t fix the structural issue.
Don’t Ignore New Blisters
If you’re getting blisters in new spots, it’s not just your socks. Worn insoles or collapsed arches change foot positioning, increasing friction. This is an early warning sign.
Test Lacing and Fit Stability
Frayed Laces and Broken Eyelets
Laces wear out first. But if eyelets are bent, loose, or missing, you can’t achieve a snug fit.
Why it matters:
– Poor lacing = heel slippage = blisters
– Inability to lock down the midfoot = instability on descents
Replace laces easily. But if hardware fails, the boot’s structural integrity is compromised.
Heel Slip and Fit Changes
If your heel lifts more than 1/4 inch on descents, your boots may be stretched or worn at the collar. Break-in causes some stretch, but excessive looseness after years of use means materials have degraded.
Assess Waterproofing Performance
Water Seepage Isn’t Always the Membrane’s Fault
Waterproof boots use Gore-Tex, eVent, or treated leather. But water can enter through damaged stitching, worn DWR, or cracks in the upper.
Test after cleaning:
1. Submerge the lower third in water.
2. Squeeze the upper.
3. Look for bubbles (air escaping) or moisture inside.
Bubbles mean a breach. No bubbles but wet feet? The DWR has failed.
Re-Waterproofing Can Help
Sprays (e.g., Nikwax, Granger’s) or waxes (e.g., Sno-Seal) restore water repellency. Reapply every 4–8 weeks for frequent hikers.
But if the membrane is torn, it can’t be repaired. The boot will never stay dry.
Listen to Your Body’s Pain Signals
Joint Pain Means Boot Failure
If you’re developing knee, hip, or back pain on hikes you used to handle easily, blame the boots—not your age.
Worn midsoles transfer more shock. Poor support alters gait. Both lead to overuse injuries.
Ask yourself:
– Do my knees hurt more on descents?
– Is my lower back stiff after short hikes?
– Do I feel unsteady?
If yes, your boots may be the culprit.
Instability on Technical Terrain
Boots should inspire confidence. If you feel like you’re rolling an ankle or losing balance on uneven ground, it’s time to retire them—even if they look okay.
Safety trumps sentiment. No boot is worth a sprain miles from the trailhead.
Repair vs. Replace: When to Decide
Fixable Issues That Extend Life
Some problems can be repaired:
– Replace insoles – $20, instant upgrade
– Re-waterproof – simple, cheap, effective
– Glue small separations – use rubber cement
– Resole with Vibram – $80–$120, can double boot life
– Replace laces and eyelets – minor hardware fixes
Tip: Brands like Danner, KEEN, and Vibram offer resole services.
When Replacement Is Necessary
Replace boots when:
– Midsole is cracked or bottomed out
– Tread is less than 1–2 mm deep
– Upper has holes or major tears
– Sole is delaminating beyond patching
– Ankle support is gone
– Pain persists despite repairs
One hiker kept Vasque boots for 20 years with resoles—but that’s rare. Most boots won’t last that long.
Extend Boot Life With Smart Habits
Clean, Dry, and Store Properly
After every hike:
– Brush off dirt
– Wipe with a damp cloth
– Remove insoles and laces
– Stuff with newspaper or use a boot dryer
– Store in a cool, dry place
Wet boots break down faster. Mold weakens glue and fabric.
Rotate Your Footwear
Using one pair constantly accelerates wear. Rotate 2–3 pairs:
– One for rugged trails
– One for light hikes
– One for casual use
Rotation lets materials recover and spreads out wear.
Use Boots for Their Purpose
Avoid wearing hiking boots for:
– Yard work
– Dog walking
– Travel (unless hiking right after)
Every mile counts. Save your trail boots for the trail.
Recycle or Donate Old Boots
Sustainable End-of-Life Options
Don’t toss worn boots. Consider:
– Nike Reuse a Shoe: Recycles into playground surfaces
– Asics Give Back Box: Mail-in recycling
– Ridwell: Recycles in select U.S. regions
– Local textile programs: Check RecyclePlus or Oregon Metro
– Thrift donation: Only if clean, dry, and intact
Severely damaged or smelly boots? Recycle, don’t donate.
Repurpose for Low-Impact Use
Retire boots to:
– Gardening
– Firewood chopping
– Muddy events
– Pet walking
They’ve earned a second life—just not on technical trails.
Final Checklist: Time to Replace?
✅ Replace if:
– Midsole is cracked or compressed
– Tread is bald (under 2 mm)
– Upper has holes or tears
– Sole is delaminating
– Ankle support is soft or collapsed
– You feel pain or instability
– Waterproofing fails despite treatment
– Lacing system is broken
✅ Repair or extend life if:
– Only insole is worn (replace it)
– DWR failed (re-treat)
– Minor sole separation (glue or resole)
– Laces or eyelets broke (replace parts)
– Boots are under 500 miles and in good shape
Final Note: How often to replace hiking boots isn’t about a calendar or odometer—it’s about condition, comfort, and safety. Track your miles, inspect your boots every few months, and listen to your body. When support fades and pain rises, it’s time. Investing in new boots isn’t an expense—it’s protection for your feet, joints, and future adventures.